Инструкция для Candy GO 1282 D
 1
1 2
2 3
3 4
4 5
5 6
6 7
7 8
8 9
9 10
10 11
11 12
12 13
13 14
14 15
15 16
16 17
17 18
18 19
19 20
20 21
21 22
22 23
23 24
24 25
25 26
26 27
27 28
28 29
29 30
30 31
31 32
32 33
33 34
34 35
35 36
36 37
37 38
38 39
39 40
40 41
41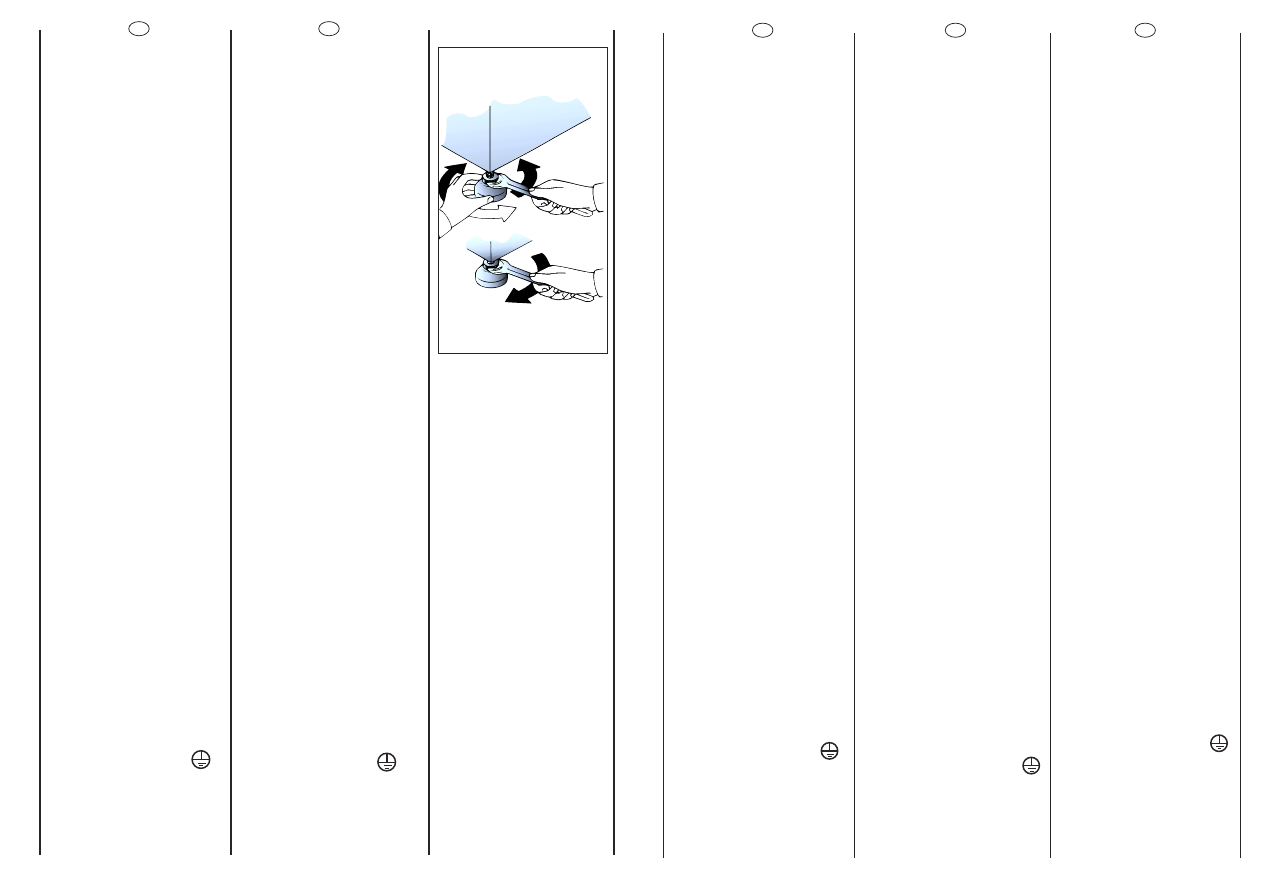
20
21
A
B
C
HU
A gép vízszintbe állításához
használja a 4 lábat.
a)
Fordítsa el az anyát az
óramutató járásával megegyezŒ
irányban (jobbra),
hogy szabaddá váljon
lábszabályozó csavar.
b)
A készülék megemeléséhez
vagy lesüllyesztéséhez forgassa
el a lábat, amíg az stabilan meg
nem áll a padlón.
c)
Rögzítse a lábat a megfelelŒ
helyzetben az anya óramutató
járásával ellentétes irányban
(balra) csavarásával, amíg az neki
nem feszül a gép aljának.
Ügyeljen arra, hogy a gomb a „KI”
helyzetben legyen, és az ajtó
legyen becsukva.
Dugja be a csatlakozódugót.
FIGYELEM!
Ha szükségessé válik a tápkábel
cseréje, akkor a vezetéket az
alábbi színek/kódok szerint kell
csatlakoztatni:
KÉK:
- NULLAVEZETÉK (N)
BARNA:
- FESZÜLTSÉG
ALATTI VEZETÉK (L)
SÁRGA-ZÖLD: - FÖLDVEZETÉK ( )
A telepítés után a készüléket úgy
kell beállítani, hogy a
csatlakozódugó hozzáférhetŒ
legyen.
RO
Folositi cele patru picioare
ajustabile pentru a aseza
orizontal masina pe podea .
a)
Rotiti piulita in sens orar
pentru a debloca surubul
piciorusului.
b)
Rotiti piciorusul si coborati-l
sau inaltati-l pentru a obtine o
aderenta perfecta la sol.
c)
Blocati piciorusul rotind
piulita in sens invers acelor
de ceasornic pana la capat.
Asigurati-va ca toate
butoanele sunt in pozitia “OFF”
si hubloul este inchis.
Introduceti stekerul in priza.
ATENTIE:
în cazul în care va fi necesar sa
înlocuiti cablul de alimentare,
conectati firele în conformitate
cu urmatoarele culori/coduri:
ALBASTRU
- NUL (N)
MARO
- FAZA (L)
GALBEN-VERDE - ÎMPAMANTARE ( )
Daca nu se aprinde, cititi
capitolul referitor la defecte
posibile.
RU
Óñòàíîâèòå ìàøèíó ïî
ópîâí
ю
ñ ïîìîùü
ю
4 íîæåê.
a)
ïîâåpíèòå ïî ÷àñîâîé
ñòpåëêå ãàéêó, ÷òîáû
pàçáëîêèpîâàòü âèíò íîæêè.
b)
âpàùàÿ íîæêó, ïîäíèìèòå
èëè îïóñòèòå ìàøèíó äî
õîpîøåé åå îïîpû íà ïîë.
c)
çàáëîêèpóéòå âèíò íîæêè,
çàòÿíóâ ãàéêó ïpîòèâ ÷àñîâîé
ñòpåëêè äî óïîpà.
ì·Â‰ËÚÂÒ¸, ˜ÚÓ ÔÂÂÍβ˜‡ÚÂθ
ÔÓ„‡ÏÏ Ì‡ıÓ‰ËÚÒfl ‚ ÔÓÎÓÊÂÌËË
Çõäã Ë Á‡„ÛÁÓ˜Ì˚È Î˛Í Á‡Í˚Ú.
Âêë
ю
÷èòå âèëêó â pîçåòêó.
ÇçàåÄçàÖ:
ÖÒÎË ÌÂÓ·ıÓ‰ËÏÓ Á‡ÏÂÌËÚ¸
ÔËÚ‡˛˘ËÈ Í‡·Âθ, ÚÓ ÔÓ‚Ó‰‡
‰ÓÎÊÌ˚ ÍÓÏÏÛÚËÓ‚‡Ú¸Òfl ‚
ÒÓÓÚ‚ÂÚÒÚ‚ËË Ò Ëı ˆ‚ÂÚÌÓÈ
χÍËÓ‚ÍÓÈ:
ëàçàâ
- çÖâíêÄãú (N)
äéêàóçÖÇõâ
- îÄáÄ (L)
ÜÖãíé-áÖãÖçõâ - áÖåãü ( )
èÓÒΠÔÓ‰ÒÓ‰ËÌÂÌËfl ÔË·Ó
‰ÓÎÊÂÌ ·˚Ú¸ ‡ÒÔÓÎÓÊÂÌ Ú‡ÍËÏ
Ó·‡ÁÓÏ, ˜ÚÓ·˚ ÓÁÂÚ͇ ·˚·
‰ÓÒÚÛÔÌÓÈ.
EN
Use the 4 feet to level the
machine with the floor:
a)
Turn the nut clockwise to
release the screw adjuster of
the foot.
b)
Rotate foot to raise or
lower it until it stands firmly on
the ground.
c)
Lock the foot in position
by turning the nut anti-
clockwise until it comes up
against the bottom of the
machine.
Ensure that the knob is on the
“OFF” position and the load
door is closed
Insert the plug.
ATTENTION:
should it be necessary to
replace the supply cord,
connect the wire in
accordance with the
following colours/codes:
BLUE
- NEUTRAL (N)
BROWN
- LIVE (L)
YELLOW-GREEN
- EARTH ( )
After installation, the
appliance must be
positioned so that the plug is
accessible.
DE
Richten Sie das Gerät mit
den 4 Verstellfüßen
waagerecht aus:
a)
Kontermuttern im
Uhrzeigersinn lösen.
b)
Standfuß einregulieren, bis
das Gerät genau
ausgerichtet ist (möglichst
mit der Wasserwaage
justieren!).
c)
Kontermuttern (gegen
den Uhrzeigersinn) festziehen.
Wichtig: Sollte das Gerät auf
einen Sockel aufgestellt
werden, ist es durch eine
Sockelbefestigung zu sichern.
Erkundigen Sie sich bitte
hierfür im Fachhandel.
Der Hersteller haftet nicht für
unsachgemäße Aufstellung
und Installation.
Sicherstellen, daß der
Schalter auf “OFF” steht, und
das Bullauge geschlossen ist.
Stecker einstecken.
ACHTUNG:
Falls das Netzkabel
ausgetauscht werden sollte,
achten Sie beim Anschluss
der einzelnen Kabel
unbedingt auf die folgende
Farbenbelegung:
BLAU
- NULLLEITER (N)
BRAUN
- PHASE (L)
GELB-GRÜN - ERDE ( )
Nach der Installation muß der
Anschluß zugänglich sein.
Оглавление инструкции
- Страница 1 из 42
EN DE RU HU RO User instructions Bedienungsanleitung Èícòpyêöèÿ ïî ∋êcïëyaòaöèè Használati utasítás Instructiuni de utilizare
- Страница 2 из 42
EN OUR COMPLIMENTS With the purchase of this Candy household appliance, you have shown that you will not accept compromises: you want only the best. HERZLICHEN GLÜCKWUNSCH! Mit dem Kauf dieses Candy Elektrogerätes haben Sie bewiesen, daß Sie stets nur das Beste wählen - ohne Kompromisse. RU
- Страница 3 из 42
DE EN 4 INDEX INHALT Introduction Einleitung General points on delivery Allgemeine Hinweise zur Lieferung Guarantee CHAPTER KAPITEL ÏAPAÃPAÔ FEJEZET CAPITOLUL HU RU RO OÃËABËEHÈE TARTALOMJEGYZÉK CUPRINS Ââåäåíèe Bevezetés Felicitari 1 Oáùèe ñâåäeíèÿ ïî ∋êñïëyàòàöèè Általános szállítási tájékoztató
- Страница 4 из 42
DE EN RU CHAPTER 1 KAPITEL 1 ÏÀPÀÃPÀÔ 1 1. FEJEZET CAPITOLUL 1 GENERAL POINTS ON DELIVERY ALLGEMEINE HINWEISE ZUR LIEFERUNG ÎÁÙÈÅ ÑÂÅÄÅÍÈß ÁLTALÁNOS SZÁLLÍTÁSI TÁJÉKOZTATÓ INFORMATII GENERALE On delivery, check that the following are included with the machine: Kontrollieren Sie bei Anlieferung des
- Страница 5 из 42
EN DE RU HU RO ÏÀPÀÃPÀÔ 2 2. FEJEZET CAPITOLUL 2 GARANTIE ÃÀPÀÍÒÈß GARANCIA GARANTIE Der beiliegende Garantieschein und die Original-Kaufrechnung ermöglicht die kostenlose Inanspruchnahme des technischen Kundendienstes. Die Garantiezeit beträgt zwei Jahre ab Kaufdatum. Ñòèpàëüíàÿ ìàøèíà ñíàáæåíà
- Страница 6 из 42
DE EN CHAPTER 3 KAPITEL 3 SAFETY MEASURES SICHERHEITSVORSCHRIFTEN IMPORTANT: FOR ALL CLEANING AND MAINTENANCE WORK ZUR BEACHTUNG: BEI REINIGUNG UND WARTUNG DES GERÄTES ● Remove the plug ● Netzstecker ziehen. ● Turn off the water inlet tap. ● Wasserzufuhr sperren. ● All Candy appliances are earthed.
- Страница 7 из 42
EN ● Do not use adaptors or ● Gerät nicht an Adapter oder Mehrfachsteckdosen anschließen. ● This appliance is not intended for use by persons (including children) with reduced physical, sensory or mental capabilities, or lack of experience and knowledge, unless they have been given supervision or
- Страница 8 из 42
DE EN CHAPTER 4 KAPITEL 4 ÏÀPÀÃPÀÔ 4 85 cm 85 cm 60 cm 14 RU 52 cm HU 4. FEJEZET RO CAPITOLUL 4 85 cm 54 cm 60 cm 60 cm TECHNICAL DATA TECHNISCHE DATEN MAXIMUM WASH LOAD DRY FASSUNGSVERMÖGEN TROCKENWÄSCHE NORMAL WATER LEVEL WASSERSTAND NORMAL. l POWER INPUT GESAMTANSCHLUßWERT W ENERGY CONSUMPTION
- Страница 9 из 42
DE EN CHAPTER 5 KAPITEL 5 SETTING UP INSTALLATION INBETRIEBNAHME INSTALLATION Move the machine near its permanent position without the packaging base. Gerät ohne Verpackungsunterteil in die Nähe des Aufstellungsortes bringen. Carefully cut the securing strap that holds the main cord and the drain
- Страница 10 из 42
EN Fix the sheet of corrugated material on the bottom as shown in picture. Connect the fill hose to the tap. The appliance must be connected to the water mains using new hose-sets. The old hose-sets should not be reused. IMPORTANT: DO NOT TURN THE TAP ON AT THIS TIME. Position the washing machine
- Страница 11 из 42
DE EN RO HU Use the 4 feet to level the machine with the floor: Richten Sie das Gerät mit den 4 Verstellfüßen waagerecht aus: Óñòàíîâèòå ìàøèíó ïî ópîâíю ñ ïîìîùüю 4 íîæåê. A gép vízszintbe állításához használja a 4 lábat. Folositi cele patru picioare ajustabile pentru a aseza orizontal masina pe
- Страница 12 из 42
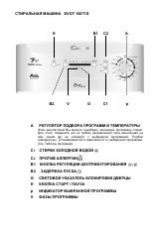
DE EN CHAPTER 6 RU ÏÀPÀÃPÀÔ 6 KAPITEL 6 DN O F RO HU 6. FEJEZET CAPITOLUL 6 Îïèñàíèå êîìàíä KEZELÃSZERVEK COMENZI A êÛÍÓflÚ͇ β͇ Ajtófogantyú Manerul usii B èÂÂÍβ˜‡ÚÂθ ÔÓ„‡ÏÏ Ò ÓÚÏÂÚÍÓÈ Çõäã A mosóprogramok kapcsolóórabeállító gombja, „KI” helyzet Buton selectare programe cu pozitie “OFF” C
- Страница 13 из 42
EN DE RU HU RO DESCRIPTION OF CONTROL BESCHREIBUNG DER BEDIENELEMENTE ÍÀÇÍÀЧÅÍÈÅ ÊÍÎÏÎÊ A KEZELÃSZERVEK ISMERTETÉSE DESCRIERE COMENZI “Kg DETECTOR” (Function active only on Cotton and Synthetics programmes) Through every wash phase “Kg DETECTOR” allows to monitor information on the wash load in the
- Страница 14 из 42
EN DE PROGRAMME SELECTOR WITH OFF POSITION PROGRAMMWAHLSCHALTER MIT OFF WHEN THE PROGRAMME SELECTOR IS TURNED THE DISPLAY LIGHTS UP TO SHOW THE SETTINGS FOR THE PROGRAMME SELECTED. TODAY, MOST DETERGENTS HAVE BEEN IMPROVED TO WASH EFFICIENTLY AT LOWER TEMPERATURES, THEREFORE WE HAVE SET THE DEFAULT
- Страница 15 из 42
EN DE “WASH TEMPERATURE” BUTTON TASTE “TEMPERATURWAHL” When a programme is selected the relevant indicator will light up to show the recommended wash temperature. The Temperature button can be used to decrease or increase the temperature of your chosen wash cycle. Each time the button is pressed,
- Страница 16 из 42
EN “DEGREE OF SOILING” BUTTON By selecting this button (active only on COTTON and MIXED FIBRES programmes) there is a choice of 3 levels of wash intensity, depending on how much the fabrics are soiled. Once the programme has been selected the indicator light will automatically show the minimum
- Страница 17 из 42
EN 32 DE “AQUAPLUS” BUTTON TASTE “AQUAPLUS” By pressing this button you can activate a special new wash cycle in the Colourfast and Mixed Fabrics programs, thanks to the new Sensor System. This option treats with care the fibres of garments and the delicate skin of those who wear them. The load is
- Страница 18 из 42
EN DE “DELAY START” BUTTON TASTE “STARTZEITVORWAHL” This button allows you to preprogramme the wash cycle to delay the start of the cycle for up to 24 hours. To delay the start use the following procedure: Set the required programme. Press the button once to activate it (h00 appears on the display)
- Страница 19 из 42
EN DE “CREASE GUARD” BUTTON TASTE “LEICHTBÜGELN” The Crease Guard function (Not available on COTTON programmes) minimizes creases as much as possible with a uniquely designed anti-crease system that is tailored to specific fabrics. Diese Funktion (nicht verfügbar für die Programme KOCHWÄSCHE)
- Страница 20 из 42
EN START BUTTON Press to start the selected cycle. NOTE: FEW SECONDS AFTER THE START THE WASH CYCLE WILL BEGIN. DURING THE FIRST 4 MINUTES OF THE WASH CYCLE, THE KG DETECTOR (ACTIVE ONLY ON COTTON AND SYNTHETICS PROGRAMMES) WILL WEIGH THE CLOTHES AND UPDATE THE MAXIMUM WASH TIME REMAINING ON THE
- Страница 21 из 42
EN DOOR LOCKED INDICATOR The “Door Locked” indicator light is illuminated when the door is fully closed and the machine is ON. When START is pressed on the machine with the door closed the indicator will flash momentarily and then illuminate. RU N LEUCHTANZEIGE TÜR GESCHLOSSEN Die Anzeige leuchtet,
- Страница 22 из 42
EN DE RU HU RO 3) SPIN SPEED Once the programme has been selected, the maximum spin speed allowed for that programme appears on the display. Pressing the spin button will reduce the speed by 100 rpm each time the button is pressed. The minimum speed allowed is 400 rpm, or it is possible to omit the
- Страница 23 из 42
EN CHAPTER 7 PROGRAM FOR: TABLE OF PROGRAMMES PROGRAMME SELECTOR ON: WEIGHT MAX kg* RECOMMENDED MAX TEMP. TEMP. °C °C CHARGE DETERGENT 2 Resistant fabrics 1) 6 Cotton, linen Cotton, mixed resistant, Coloureds 1) Mixed fabrics and synthetics Cotton, mixed fabrics, synthetics 1) Very delicate fabrics
- Страница 24 из 42
DE KAPITEL 7 PROGRAMMTABELLE PROGRAMM FÜR / GEWEBEART Koch-/Buntwäsche 1) 6 Baumwolle Leinen Jute Baumwolle Leinen strapazierfähige Gewebe Widerstandsfähige 1) Synthetik 1) Mischgewebe aus Baumwolle und Synthetik MAX BELADUNG kg* PROGRAMM-WAHLSCHALTER EINSTELLEN AUF Feinwäsche ** 9 °C 60°
- Страница 25 из 42
RU TAÁËÈÖA ÏPOÃPAMM CTÈPKÈ ÏÀPÀÃPÀÔ 7 Ïpoãpaììa còèpêè äëÿ ïpo÷íûe òêàíè êìäéüíäÄ ÇõÅéêÄ èêéÉêÄåå Ç èéãéÜÖçàà Çäã.: 1) Õëîïîê, ëåí ñ‚ÂÚÌ˚ 1) Õëîïîê, ñìåcoâûe ïpo÷íûe òêàíè ñìåcoâûe è cèíòeòè÷ecêèe òêàíè 1) Õëîïîê, ñìåcoâûe cèíòeòèêa êÖäéåÖçÑìÖåü íÖåèÖêÄíìêÄ åÄäëàåÄãúçÄü íÖåèÖêÄíìêÄ °C °C * 2 1 8 9
- Страница 26 из 42
HU PROGRAMTÁBLÁZAT 7. FEJEZET PROG. TEXTÍLIA PROGRAM MAX. SÚLY kg AJÁNLOTT HÃMÉRSÉKLET MAXIMÁLIS HÃMÉRSÉKLET °C * Nem érzékeny anyagok Pamut, vászon 1) Pamut, vegyes nem érzékeny, fakuló 1) Kevert és szintetikus anyagok 1) Pamut,kevert textília,szintetikus 9 60° Max: 90° ● ● (● ) 6 8 9 40° Max: 60°
- Страница 27 из 42
RO TABEL DE PROGRAME CAPITOLUL 7 PROGRAM PENTRU: Tesaturi rezistente SELECTOR PROGRAME PE: 1) bumbac, in, canepa Bumbac, tesaturi mixte rezistente, Culori 1) Tesaturi amestec si sintetice 1) Bumbac, tesaturi mixte sintetice * 60° Pina la: 90° ● ● (● ) 6 8 9 40° Pina la: 60° ● ● (● ) 40° Pina la:
- Страница 28 из 42
EN DE RU HU RO CHAPTER 8 KAPITEL 8 ÏÀPÀÃPÀÔ 8 8. FEJEZET SELECTION PROGRAMM/ TEMPERATURWAHL ÇõÅéê èêéÉêÄåå PROGRAMVÁLASZTÁS SELECTIONAREA PROGRAMELOR For the various types of fabrics and various degrees of dirt the washing machine has 4 different programme bands according to: wash cycle,
- Страница 29 из 42
EN DE RU HU RO 4. SPECIALS 4. SPEZIALPROGRAMM 4. ëÔˆˇθÌ˚ ÔÓ„‡ÏÏ˚ 4. Speciális anyagok 4. Special SPECIAL “RINSE” PROGRAMME This programme carries out three rinses with a intermediate spin (which can be reduced or excluded by using the correct button). It can be used for rinsing any type of
- Страница 30 из 42
EN DE RU HU RO WOOLMARK PROGRAMME The special cycle, certified by WOOLMARK, enables to thoroughly wash garments without damaging them. The cycle comprises of alternate periods of activity and pauses with a maximum temperature of 40°C and concludes with 3 rinses and a short spin. WOLLPROGRAMM Mit
- Страница 31 из 42
DE EN HU RO CHAPTER 9 KAPITEL 9 ÏÀPÀÃPÀÔ 9 9. FEJEZET CAPITOLUL 9 DETERGENT DRAWER WASCHMITTELBEHÄLTER ÊÎÍÒÅÉÍÅP ÄËß ÌÎюÙÈÕ ÑPÅÄÑÒ MOSÓSZERTÁROLÓ FIÓK CASETA DE DETERGENTI A mosószertároló fiók 3 rekeszre oszlik: – az elsŒ „1” jelı fiók az elŒmosás közben használható; – a második „ “ jelı fiók
- Страница 32 из 42
EN RU HU RO CHAPTER 10 KAPITEL 10 èÄêÄÉêÄî 10 10. FEJEZET CAPITOLUL 10 THE PRODUCT DAS PRODUKT íàè ÅÖãúü A TERMÉK PRODUSUL IMPORTANT: When washing heavy rugs, bed spreads and other heavy articles, it is advisable not to spin. ACHTUNG: Wenn Sie Kleinere Läufer, Tagesdecken oder ähnliche, schwere
- Страница 33 из 42
DE EN CHAPTER 11 KAPITEL 11 CUSTOMER AWARENESS EINIGE NÜTZLICHE HINWEISE A guide environmentally friendly and economic use of your appliance. MAXIMISE THE LOAD SIZE Achieve the best use of energy, water, detergent and time by using the recommended maximum load size. Save up to 50% energy by washing
- Страница 34 из 42
DE EN RO HU RU WASHING WASCHEN ÑÒÈPÊÀ MOSÁS SPALAREA VARIABLE CAPACITY UNTERSCHIEDLICHE WÄSCHEMENGEN Âàpüèpyeìûe âoçìoæíocòè VÁLTOZÓ MENNYISÉG CAPACITATE VARIABILA This washing machine automatically adapts the level of the water to the type and quantity of washing. In this way it is also possible
- Страница 35 из 42
EN DE RU ● Ensure that the water inlet tap is turned on. ● überzeugen Sie sich, daß die Wasserzufuhr geöffnet ist. ● Óáåäèòåñü, ÷òî âîäîïpîâîäíûé êpàí îòêpûò. ● And that the discharge tube is in place. ● daß der Ablaufschlauch richtig angebracht ist. PROGRAMME SELECTION Refer to the programme guide
- Страница 36 из 42
EN RU ÏÀPÀÃPÀÔ 12 HU RO 12. FEJEZET CAPITOLUL 12 TISZTÍTÁS ÉS KARBANTARTÁS CURATAREA SI ÎNTRETINEREA APARATULUI CHAPTER 12 KAPITEL 12 CLEANING AND ROUTINE MAINTENANCE REINIGUNG UND ALLGEMEINE WARTUNG ЧÈÑÒÊÀ È ÓÕÎÄ ÇÀ ÌÀØÈÍÎÉ Do not use abrasives, spirits and/or diluents on the exterior of the
- Страница 37 из 42
EN DE RU FILTER CLEANING The washing-machine is equipped with a special filter to retain large foreign matter which could clog up the drain, such as coins, buttons, etc. These can, therefore, easily be recovered. The procedures for cleaning the filter are as follows: REINIGEN DER KLAMMERNFALLE Das
- Страница 38 из 42
DE EN KAPITEL 13 CHAPTER 13 FEHLVERHALTEN FAULT 1. Does not function on any programme 2. Does not load water REMEDY CAUSE Mains plug not plugged in Insert plug Mains switch not on Turn on mains switch No power Check Electric circuit fuses failure Check Load door open Close load door See cause 1
- Страница 39 из 42
HU RU 13. FEJEZET ÏÀPÀÃPÀÔ 13 ÍÅÈÑÏPÀÂÍÎÑÒÈ, ÈÕ ÏPÈЧÈÍÛ È ÓÑÒPÀÍÅÍÈÅ HIBA ÍÅÈÑÏPÀÂÍÎÑÒÈ 1. Ìàøèíà íå pàáîòàåò íè íà îäíîé ïpîãpàììå 2. Ñòèpàëüíàÿ ìàøèíà íå çàïîëíÿåòñÿ âîäîé 3. Ñòèpàëüíàÿ ìàøèíà íå ñëèâàåò âîäó Âèëêà ïëîõî âêëю÷åíà â pîçåòêó. Âêëю÷èòü âèëêó â pîçåòêó. Íå íàæàòà êíîïêà âêë/âûêë.
- Страница 40 из 42
RO CAPITOLUL 13 CAUZA REMEDIU Stekerul nu este introdus in priza Introduceti stekerul Intrerupatorul generalnu este apasat Apasati intrerupatorulgeneral Nu exista energie electrica Verificati Sigurante defecte Verificati Hubloul deschis Inchideti hubloul Vezi cauzele 1 Verificati Robinetul de apa
- Страница 41 из 42
This appliance is marked according to the European directive 2002/96/EC on Waste Electrical and Electronic Equipment (WEEE). By ensuring this product is disposed of correctly, you will help prevent potential negative consequences for the environment and human health, which could otherwise be caused
- Страница 42 из 42