Инструкция для Hyundai H-DVR09HD
 1
1 2
2 3
3 4
4 5
5 6
6 7
7 8
8 9
9 10
10 11
11 12
12 13
13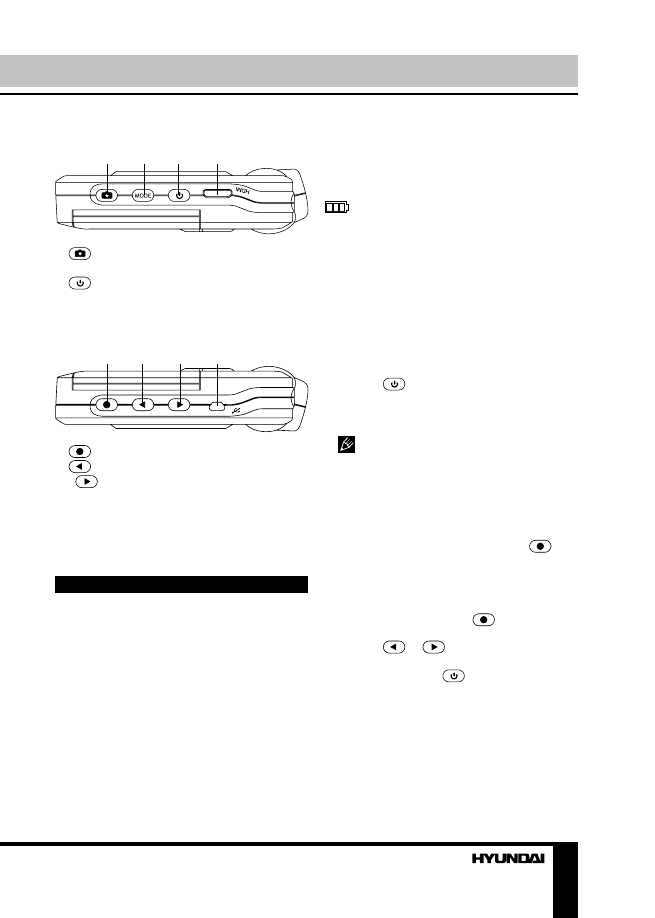
2
3
Instruction Manual
Instruction Manual
Right panel
4
5
6
7
4.
button
5. MODE button
6.
button
7. HDMI output
Left panel
8
9
10
11
8.
button
9.
button
10.
button
11. USB port
Not indicated:
RESET hole button (bottom),
Memory card slot (back side)
Operations
Mounting
• Insert the fixing pins on the top of the
stand into the bracket holding holes in the
bottom of the unit and move the unit backward
until a click to fix it tightly to the bracket.
• Press the suction cup to a surface in the
car, then push the pressure valve down. Make
sure the stand is fixed properly to the surface.
• You can adjust the angle of the stand by
loosening the upper and lower washers and
bending the assembly knots.
• To unmount the stand, lift the pressure
valve, then lift the plastic ear on the suction cap.
Power and charging
To charge the battery of this unit connect
its USB port to the PC with the supplied USB
cable; or connect it to a car lighter socket
with the supplied car adapter. The power icon
on the upper right corner of the display
indicates the remaining battery power.
Rotary display
To improve the display angle for viewing it,
you can rotate the display in one plane relative to
the hinge axis 180
0
leftwards and 90
0
rightwards.
Get ready for record
• Before you start recording, insert a MicroSD
memory card into the memory card slot of this
unit until a click. Insert the card with correct side.
• Press
button to switch the unit on.
“FULL HD” will be shown in the left upper
corner of the display showing that the unit is
ready for recording.
MicroSD capacity supported: up to 32
Gb. For correct and satisfactory operation,
licensed MicroSD memory cards of famous
brands should be used with this unit. Avoid
using memory cards of unknown brands.
Recording
• When the unit is turned on, press
button to start recording video. The unit will
save video files automatically after each 2, 5
or 10 minutes. When the memory card is filled,
old files will be deleted and the new files will
be recorded instead. Press
button to stop
and to continue recording.
• Press
or
button to zoom in or
out.
• Press repeatedly
button to select a
flash mode.
• You can record video while charging the
unit. Connect this unit to a car lighter socket to
start charging it. The unit will be turned on and
start video recording at the same time when
your car engine is started. It would save video
files automatically and be switched off after the
car is stopped.
Оглавление инструкции
- Страница 1 из 14
H-DVR09HD CAR VIDEO RECORDER АВТОМОБИЛЬНЫЙ ВИДЕОРЕГИСТРАТОР Instruction manual Руководство по эксплуатации
- Страница 2 из 14
Instruction Manual Dear customer! Thank you for purchasing our product. For safety, it is strongly recommended to read this manual carefully before connecting, operating and/or adjusting the product and keep the manual for reference in the future. Utilization of the product If you want to dispose
- Страница 3 из 14
Instruction Manual Right panel 4 5 Power and charging 6 7 Rotary display 4. button 5. MODE button button 6. 7. HDMI output To improve the display angle for viewing it, you can rotate the display in one plane relative to the hinge axis 1800 leftwards and 900 rightwards. Get ready for record Left
- Страница 4 из 14
Instruction Manual • Before removing memory card stop recording. Press on the card until a click to remove it. • Motion detector recording is available after you switch on this item in the setting menu (see “Setup“ paragraph below for more details). The unit will go to recording mode if there is
- Страница 5 из 14
Instruction Manual • Auto power off: off/1 min/3min/5min. Select the period after which the unit will turn off if no operation is performed. • Power on delay: off/10 sec/20 sec/30 sec. • Auto LCD off: off/30 sec/60 sec. Select the period after which the display will automatically switch off. Press
- Страница 6 из 14
Instruction Manual Specifications Lens view angle Display Light sensitivity Video resolution Video record format Audio format Photo format Interfaces Built-in battery Operation period Nominal voltage Nominal power consumption Current consumption Motion detector Cycled recording Max record fragment
- Страница 7 из 14
Руководство по эксплуатации Уважаемый покупатель! Благодарим Вас за покупку нашего изделия. Чтобы понять, как правильно и безопасно пользоваться Вашей моделью изделия, рекомендуется тщательно изучить настоящее руководство перед подключением, регулировкой и эксплуатацией изделия. Сохраняйте
- Страница 8 из 14
Руководство по эксплуатации Левая панель Органы управления 8 Передняя панель 1 2 9 10 11 3 8. Кнопка 9. Кнопка 10. Кнопка 11. USB-порт Не показано на рисунке: Кнопка (отверстие) RESET (на дне корпуса), слот для карт памяти (на тыльной стороне) Операции с устройством Крепление устройства 1.
- Страница 9 из 14
Руководство по эксплуатации оси шарнира на 1800 влево и на 900 вправо. Питание и зарядка Для зарядки аккумулятора устройства подключите его через USB-порт к персональному компьютеру, либо к разъему прикуривателя автомобиля с помощью автомобильного адаптера. Индикатор заряда ( ) в правом верхнем
- Страница 10 из 14
Руководство по эксплуатации поставки. Теперь видеорегистратор можно использовать как источник цифрового сигнала высокого качества для подключенного внешнего устройства. Настройки Нажмите кнопку MODE трижды для вызова экранного меню настроек. Находясь / для в меню, нажимайте кнопки выбора параметров
- Страница 11 из 14
Руководство по эксплуатации • Мерцание: 50 Гц/60 Гц. • Резкость: стандарт/жестк./мягк. Выберите режим резкости изображения. • ISO чувствительность: Авто/100/200/ 400. Компенсация ISO-чувствительности. • Баланс белого: Авто/солнечно/облачно/ лампы дневного света/лампы накаливания. Выберите режим
- Страница 12 из 14
Руководство по эксплуатации Технические характеристики Угол обзора объектива Дисплей Световая чувствительность Разрешение видеозаписи Формат записи видео Формат аудио Интерфейс Встроенный аккумулятор Продолжительность работы Номинальное напряжение питания Номинальная потребляемая мощность Ток
- Страница 13 из 14
- Страница 14 из 14