Инструкция для Hyundai H-CMD2005
 1
1 2
2 3
3 4
4 5
5 6
6 7
7 8
8 9
9 10
10 11
11 12
12 13
13 14
14 15
15 16
16 17
17 18
18 19
19 20
20 21
21 22
22 23
23 24
24 25
25 26
26 27
27 28
28 29
29 30
30 31
31 32
32 33
33 34
34 35
35 36
36 37
37 38
38 39
39 40
40 41
41 42
42 43
43 44
44 45
45 46
46 47
47 48
48 49
49 50
50 51
51 52
52 53
53 54
54 55
55 56
56 57
57 58
58 59
59 60
60 61
61 62
62 63
63 64
64 65
65 66
66 67
67 68
68 69
69 70
70 71
71 72
72 73
73 74
74 75
75 76
76 77
77 78
78 79
79 80
80 81
81 82
82 83
83 84
84 85
85 86
86 87
87 88
88 89
89 90
90 91
91 92
92 93
93 94
94 95
95 96
96 97
97 98
98 99
99 100
100 101
101 102
102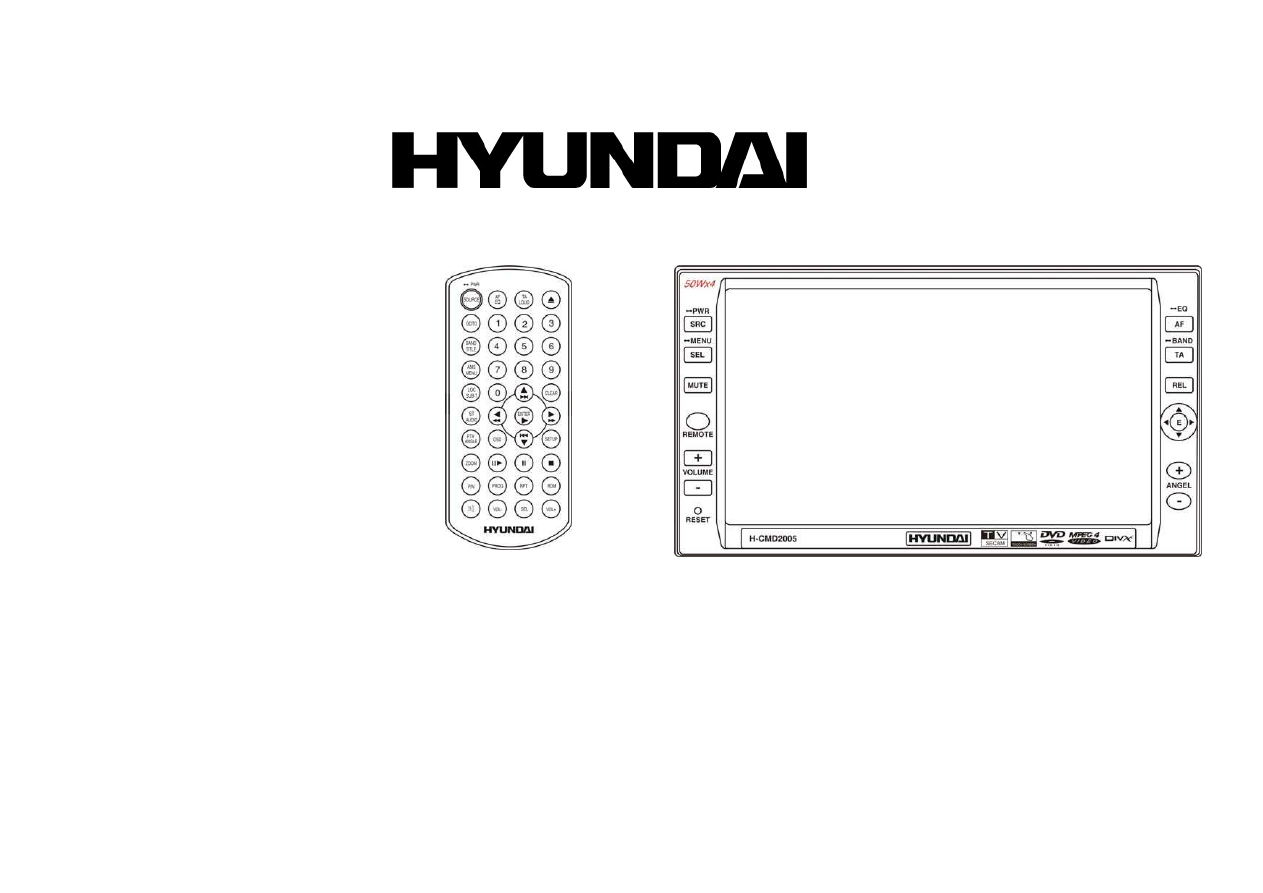
H-CMD2005
2 DIN DVD/CD/MP3 RECEIVER WITH BUILT-IN 6.5” TFT DISPLAY
Instruction manual
DVD/CD/MP3-
2 DIN
6.5” TFT-
Оглавление инструкции
- Страница 1 из 103
H-CMD2005 2 DIN DVD/CD/MP3 RECEIVER WITH BUILT-IN 6.5” TFT DISPLAY Instruction manual DVD/CD/MP3- 2 DIN 6.5” TFT-
- Страница 2 из 103
Dear customer! Thank you for purchasing our product. For safety, it is strongly recommended to read this manual carefully before connecting, operating and/or adjusting the product and keep the manual for reference in the future. Table of contents Table of
- Страница 3 из 103
Handling and cleaning discs ................................................................................................................................. 47 Troubleshooting guide
- Страница 4 из 103
Important safeguards • • • • • • • • • • • • • • Using the device at temperature below -10º may cause the breakage of the device. Before using, please, heat up the passenger compartment to the recommended temperature! Read carefully through this manual to familiarize yourself with this high-quality
- Страница 5 из 103
Accessories 5
- Страница 6 из 103
Installation/connection Installation method 1: DIN Front-mount Installation method 2: Installation using the screw holes at the sides of the unit. Select a position where the screw holes of the mounting bracket supplied with the car and the screw holes of the main unit become aligned (are fitted),
- Страница 7 из 103
Detach the unit Detach the front panel before disassembling the unit. 1. Take out the Outer trim frame. 2. Insert the keys supplied to the unit at both sides of the unit until they click. Pulling the keys makes it possible to remove the unit from the dashboard. 7
- Страница 8 из 103
Electrical Connection 1. Output plug 2. Output socket 3. Tuner reception Note: The brown wire is connected with brake signal; for safety, the programs can be seen on the monitor after braking the car, but the menu and RCA outputs are free of it. If you do not want to use this function, connect it
- Страница 9 из 103
Unit controls Front panel 1. SRC/PWR button During waiting mode, briefly press it to turn on the unit; during working status, briefly press it to select radio mode or playback mode, hold and press it to turn the unit on or off. 2. SEL/MENU button Briefly press it to select the function; keep
- Страница 10 из 103
Briefly press it to activate the traffic alarm function; press and hold it to select the bands. 10. REL button Press it to slide down the front panel, then you can insert or eject a disc or a SD card. 11. Cursor buttons Left/Right/Up/Down/F.REW/F.F/Next track/Previous Track; 12. ANGLE+/ANGLE-
- Страница 11 из 103
Remote control 1. 2. 3. 4. 5. 6. 7. 8. 9. 10. 11. 12. 13. 14. 15. 16. 17. 18. 19. 20. AF/EQ button SOURCE button GOTO button BND/TITLE button AMS/MENU button LOC/SUB-T button ST/AUDIO button OSD button PTY/ANGLE button SLOW button ZOOM button PROG button P/N button VOL +/ VOL- buttons MUTE button
- Страница 12 из 103
22. PAUSE button 23. STOP button 24. RPT button 25. RDM button 26. SEL button 12
- Страница 13 из 103
Changing the battery 1. Press the catch and at the same time pull out the battery tray (pic. 1). 2. Insert the 1 lithium battery, type CR2025 (3V) battery with the stamped (+) mark facing upward. Insert the battery tray into the remote control (pic.2). Pic. 1 Pic. 2 Warning: • Store the battery
- Страница 14 из 103
General operations Reset the Unit Operating the unit for the first time or after replacing the car battery, you must reset the unit. Remove the front panel at first, and then press RESET button on the unit with a pointed object, (such as a ballpoint pen) to set the unit to initial state. Note: When
- Страница 15 из 103
Volume Control Press VOL+/VOL- button on the RC or on the unit to increase/decrease the sound level. Turning Loudness On/Off Briefly press TA/LOUD button on the RC to activate loud function. You can press this button to increase the low frequency, which can improve sensitivity for your ears. Keep
- Страница 16 из 103
Insert an SD Card Press REL button after turning the unit on, then insert an SD card into SD slot when the TFT is slanted, and the contents of the card will be played. Clear After inputting something wrong, press CLEAR button to clear it. Mode Selector Repeatedly press SOURCE button on the RC or
- Страница 17 из 103
Main menu Note: This unit can be operated by touching the screen buttons. Thus you can select the menus and change the parameters. When the unit is on, the monitor will display main menu. Press and hold SETUP button on the RC or SEL/MENU on the head unit, or press MENU on the monitor to enter the
- Страница 18 из 103
Press and buttons to adjust the desired FAD level, press EXIT to exit this menu. Note: When adjusting the other options perform the same operation. Video Adjust In this menu you can adjust CONTRAST, COLOR, TINT, BRIGHT, PICTURE. Source Adjust You can adjust TV, CDC, GPS and AUX to ON or OFF, press
- Страница 19 из 103
System Adjust In this menu you can adjust CLOCK SYS (clock system), KEY BEEP, MONI FLEX (monitor flex), REVER POLA (reverse polarity), SUBWOOFER, AMS FULLUP, LOCAL AREA, LOCAL, GOTO FREQ, RT SCROLL, TA VOLUME, REGION, ADJ SCREEN, CLOCK ADJ. Note: Press arrow buttons at the right side of the screen
- Страница 20 из 103
AMS Fullup In this menu you can set the modes of AMS. When the setup is ON, the presettable stations are full, new one’s are not allowed. When you select OFF, it will search continually. Local Area You can select EUROPE, USA, to search the stations quickly in your current area. You can select OIRT
- Страница 21 из 103
Adj Screen Press ADJ SCREEN to display the above menu, there are a square button at the top left corner and a tip: please press the button. Press the square button at place 1, then the button will move to place 2, press it at place 2, it will move to place 3, then place 4, press SAVE at last. Clock
- Страница 22 из 103
Digital tuner operations Mode selecting Press the SRC/PWR button on the unit or SOURCE button on the RC repeatedly to switch to RADIO mode. User interface (UI) of Radio mode When the unit is switched to Radio mode, the following user interface will be displayed on the display: 1. Band indicator.
- Страница 23 из 103
Band selection Press the BND/TITLE button on the RC or on the touch screen to switch to the bands in the following order: FM1 - FM2 - FM3 - AM1 - AM2 (for two bands); FM1 - FM2 - FM3 - MW - LW (for three bands). Manual/automatic tuning • Manual tuning: Press / buttons on the RC repeatedly to select
- Страница 24 из 103
Scanning/Memorizing Stations Automatically During radio mode, you can press AMS/MENU button on the RC or AMS button on the monitor to scan each stored station for 5 seconds respectively which stored with number buttons (1 – 6). You can press the corresponding Number Buttons, AMS/MENU button on the
- Страница 25 из 103
RDS Setup 1. 2. 3. 4. 5. 6. 7. 8. 9. 10. AF. Press it to activate AF function. . Press it to activate TA function. / . Press it to select PTY code. PTY. Press it to activate PTY function. During PTY ON, press this button to search the playing track type. Displays the RADIO TEXT of the RDS station.
- Страница 26 из 103
Program Type Briefly press PTY/ANGLE button on the RC or PTY button on the monitor to activate PTY function. When PTY is on, PTY ON appears on the monitor, you can press UP/DOWN to select the program type, and then press PTY CODE to search the special program. And the monitor displays PTY SEARCH.
- Страница 27 из 103
Disc operations Discs for playback • This unit can play disc types: DVD/DVD±R/DVD±RW/CD/CD-R/CD-RW. • Compatible with formats: DVD/SVCD/VCD/MP3/WMA/HDCD/CDDA/MPEG4(DivX)/PictureCD/JPEG. • The following file types are supported: Audio files: MP3 (*.mp3) WMA (*.wma) Video files: MP4 (*.avi,
- Страница 28 из 103
DVD operations Glossary PBC (Play Back Control) Play Back Control is a menu recorded on the disc with SVCD or VCD2.0 format. For the discs contained PBC, it can playback interactive software with the menu displayed on TV. And if the disc contains still images, it can playback high definition of
- Страница 29 из 103
Playing a DVD Insert a DVD disc into the disc slot, the unit will automatically switch on, if a DVD disc is loaded, press ENTER button to start the playback. To eject a DVD press EJECT button on the unit, on the RC. Touch the screen at any place when DVD mode is on and the monitor will display the
- Страница 30 из 103
Repeat Playing Press RPT button on the RC to perform replaying function as followings: System Switch During playback mode, Press P/N button on the RC to set the TV standard to PAL or NTSC or AUTO system. Slow motion playback Press button to slow forward or slow backward. Changing the size of the
- Страница 31 из 103
Changing the viewing angle (Multi-angle) With DVDs featuring multi-angle (scenes shot from multiple angles) recordings, you can press PTY/ANGLE button to switch among viewing angles during playback. Notes: • The mark on a DVD's package indicates that it supports multi-angle scenes. • Number 3 in
- Страница 32 из 103
DVD Setup menu 1. Press SETUP button on the RC to enter the setup menu. 2. Use the / buttons to choose the setup page: General page, Dolby Digital setup, Preference page, Exit. 3. Press the button to enter the setup page selected. 4. Use / buttons to select the option you want to adjust. 5. Press
- Страница 33 из 103
If the Screen saver is set On and the unit is switched on without a disc playing for 3 minutes, a moving picture appears on the TFT. Dolby digital setup • DUAL MONO Choose the mode of the audio output: Stereo: choose this setting, when 5.1-channel sound playing, two channels of signals will be
- Страница 34 из 103
Set the desired languages for all the settings. If a setting is supported by disc content, it will work. Otherwise the disc default value works. You also can press the ST/AUDIO button on the RC to select the audio language. Press the LOC/SUB-T button on the RC to select the subtitle language. •
- Страница 35 из 103
Exit Select the Exit page to exit the Setup menu. 35
- Страница 36 из 103
VCD/CD operations Along with buttons of the RC and the unit you can use touch buttons of this menu to perform some of the following operations. Playing a VCD/CD Insert a VCD/CD disc into the disc slot, the unit will automatically switch on, if a disc is loaded, press SOURCE button to start the
- Страница 37 из 103
Number Buttons Press one of number buttons (0-9) to play a track you want. Stop Playback Press STOP button, then press ENTER or PAUSE button on the RC or on the monitor to resume playing. Pause the Playback Press PAUSE button on the RC or on the monitor to switch between play and pause. Fast
- Страница 38 из 103
On Screen Display Briefly press OSD button and the display will show: Single elapsed => Single remain => Total elapsed => Total remain => OFF. Press and hold OSD button on the RC to display the current setup. Setting the Playback Time During CD playback, press GOTO button, there will be track : — :
- Страница 39 из 103
Program Playing During VCD/CD mode, press PROG button, the monitor displays the program menu. Press number buttons to select the track number and then press cursor buttons to move the cursor to START, press ENTER button to start program playing; move the cursor to EXIT and press ENTER button to
- Страница 40 из 103
MP4 Disc operations Playing tracks Insert an MP4 (AVI, MPEG4) disc into the disc slot, the unit will automatically switch on, if a disc is loaded, press SOURCE button to start the playback. Number buttons You can select any tracks directly using number buttons (0-9). The track you selected will be
- Страница 41 из 103
On Screen Display Briefly press OSD button the display shows: Press and hold OSD button on the RC to display the current setup. Setting the Playback Time Press GOTO button, and the monitor will show: —-:-—,enter your desired time of the playback using number buttons. and press ENTER to set the
- Страница 42 из 103
MP3/SD operations Along with buttons of the RC and the unit you can use touch buttons of this menu to perform some of the following operations. Playing an MP3/SD Insert an MP3 disc into the disc slot, the unit will automatically switch on, if an MP3 disc is loaded, press SOURCE to start the
- Страница 43 из 103
Selecting the MP3/SD Track Press GOTO button and the monitor will show: ---. Then press Number Buttons to enter the Mp3 track number and press then ENTER button to play; secondly press GOTO button, and the monitor will shows: --:--, now enter the desired number to play the current track at this
- Страница 44 из 103
MP3 overview • • • • • • • • • • MP3 is short for MPEG Audio Layer 3 and refers to an audio compression technology standard. This product allows playback of MP3 files on DVD-R/-RW, DVD+R/+RW, CD-ROM, CD-R/-RW discs. The unit can read MP3 files written in the format compliant with ISO 9660. However
- Страница 45 из 103
AUX/TV operations (optional) Press SRC button to switch to AUX mode. Along with buttons of the RC and the unit you can use touch buttons of this menu to perform some of the following operations. TV touch screen menu Press SRC button to switch to the TV mode. 1. Station selector. To select 1 to 10
- Страница 46 из 103
You can adjust the following items: SOUND: M/N, B/G, D/K. BAND: V-l, V-H, UHF MODE: SECAM/NTSC/PAL 7. Mode selector 8. Preset stations. To show all of stations in item 1. 9. Frequency. To show the TV frequency. TV Station Selection Press number buttons or / buttons on the RC to select the TV
- Страница 47 из 103
Handling and cleaning discs • • • • • • • Dirty, scratched or warped discs may cause skip ping or noise. Handle the disc only by the edges. To keep clean do not touch its surface. Discs should be stored in their cases after use to avoid scratches. Do not expose discs to direct sunlight, high
- Страница 48 из 103
Troubleshooting guide Solution If the power supply is properly connected to the car accessory switch the ignition key to “ACC”. The fuse is blown. Replace the fuse. Disc cannot be loaded. Presence of disc inside the player. Remove the disc in the player then put a new upward. Disc cannot be read.
- Страница 49 из 103
Specification General Power supply: 14.4 V DC Maximum power output: 50 W x 4 channels Compatible disk types: DVD/DVD±R/DVD±RW/CD/CD-R/CD-RW Compatible formats: DVD/SVCD/VCD/MP3/WMA/HDCD/CDDA/MPEG4(DivX)/Picture-CD/JPEG Dimensions/weight: D x W x H: 172 x 178 x 100 mm / 2.6 kg ESP function: 40 sec.
- Страница 50 из 103
! . , / . ......................................................................................................................................................... 50 ...................................................................................................................................
- Страница 51 из 103
.................................................................................................. 99 ........................................................................................................................... 101 51
- Страница 52 из 103
• -10º • • . . , • . . , , . , • . . - • , , . , . • , . , • , , . . • , • , . , , , • , , . . , . • . , . , . 52
- Страница 53 из 103
1. 1 . 2. 1 . 3. 4. 1 5. 1 . 6. 2 . 7. 8. 1 53 . . 5 5-4 5 20 – 5 1 . . .
- Страница 54 из 103
/ 1: 2: . , , . 54
- Страница 55 из 103
. 1. 2. . , , . . 55
- Страница 56 из 103
1. 2. 3. : . , . RCA , . , . 56
- Страница 57 из 103
1. SRC/PWR . . , . 2. SEL/MENU . 3. . MUTE . 4. 5. . VOLUME+/ VOLUME. 6. 7. 8. RESET. TFT AF/EQ SEL. , . . . , . 9. 10. TA/BAND , REL ; . 57
- Страница 58 из 103
11. 12. / / / / ANGLE+/ANGLE- 13. EJECT. / / / . ; SD 14. REL. 15. SD . 58 .
- Страница 59 из 103
( AF/EQ SOURCE GOTO BND/TITLE AMS/MENU LOC/SUB-T ST/AUDIO OSD PTY/ANGLE SLOW ZOOM PROG P/N VOL +/ VOLMUTE TA/LOUD EJECT 0-9 NUMBER CLEAR ENTER / / / / / / FAST FORWARD / / PREVIOUS/NEXT 21. SETUP ) 1. 2. 3. 4. 5. 6. 7. 8. 9. 10. 11. 12. 13. 14. 15. 16. 17. 18. 19. 20. FAST REWIND/ 59
- Страница 60 из 103
22. 23. 24. 25. 26. PAUSE STOP RPT RDM SEL 60
- Страница 61 из 103
1. 2. , (CR 2025 3V), . • • . : . , • • . . ( –6 ). . . 61
- Страница 62 из 103
, , ); . ( RESET , . RESET : . . / SOURCE SRC/PWR , . . , . 2 . : . SEL , : BALAN => FADE => BASS => TREBL => VOLUME. VOL+/VOL- , . , AF/EQ. : POP – AF/EQ 62
- Страница 63 из 103
CLAS – ROCK – EQ OFF. – OFF. VOL+/VOL. (LOUD) TA/LOUD , . LOUD. , EJECT . , . REL , . . ANGLE+/- . MUTE . . MUTE. REL . . 63
- Страница 64 из 103
SD REL , . , , , SD CLEAR SOURCE , . SRC/PWR . , , 64 .
- Страница 65 из 103
: . . , . SETUP SEL/MENU MENU , . : AUDIO, VIDEO, SOURCE, SYSTEM, EXIT. . AUDIO ( ) AUDIO , ( ), BALANCE ( TREBLE ( ). VOLUME ) ), FAD, BASS ( 65
- Страница 66 из 103
, FAD . , EXIT, FAD, . : . VIDEO ( ) CONTRAST ( BRIGHT ( ) ), COLOR ( PICTURE ( ). 3. SOURCE ( ), TINT ( ) TV, CDC, GPS ON ( ) OFF ( OFF : ), ) AUX . . 66
- Страница 67 из 103
4. SYSTEM ( ) CLOCK SYS, KEY BEEP, MONI FLEX, REVER POLA, SUBWOOFER, AMS FULLUP, LOCAL AREA, LOCAL, GOTO FREQ, RT SCROLL, TA VOLUME, REGION, ADJ SCREEN CLOCK ADJ. : . CLOCK SYS ( ) CLOCK SYSTEM . KEY BEEP ( 12- 24- ) ; , ON ( ) OFF ( ); - ON, . MONI FLEX ( ) . MANUAL ( ) AUTO ( ). – AUTO; . 67
- Страница 68 из 103
REVER POLA ( ) . BATTERY +12 V, GROUND SUBWOOFER ( . 0 V, . ) ON AMS ( ; - ON. OFF; AMS) AMS. , ON ( . ) OFF ( ) . LOCAL AREA ( ) EUROPE, USA OIRT LOCAL ( , . ) ; ; . GOTO FREQ ( ON ( ) ), GOTO . 68 ON ( ) OFF ( )
- Страница 69 из 103
RT Scroll ( RT) : SLOW ( TA Volume ( ), NORMAL ( FAST ( ). ) : LOW ( Region ( ) ), NORMAL ( ) HIGH ( ). ) AF, ADJ SCREEN ( ON ( ). ) ADJ SCREEN . : please press the button (« 1, . .( 3 2. 4 ). SAVE. CLOCK ADJ ( , ) CLOCK ADJ . 69 »). 2,
- Страница 70 из 103
SRC/PWR SOURCE . , 1. : . , . 2. . . 3. . , . 4. SEEK+/SEEK-. ; 5. 6. 7. 8. 9. . VOL+/VOL-. . BAND. AMS. . MENU. SRC. / . ; , . . 70
- Страница 71 из 103
10. 6 . 11. RDS. , 6 . RDS SETUP. , ; , . BND/TITLE : FM1 - FM2 - FM3 - AM1 - AM2 ( ). FM1 - FM2 - FM3 - MW - LW ( • ); / / : • . 3 : / / , , . DX/LOC LOC/SUB-T . , LOC; . , . AM. : , / . 71
- Страница 72 из 103
MO/ST ST/AUDIO . MONO. . : FM. / AMS/MENU AMS 5 ; , (1 – 6). , , AMS/MENU . 2 AMS . AMS AMS/MENU . , (1 – 6). 2 . : 6 . OSD DISP . GOTO, FREQ. . 72 ,
- Страница 73 из 103
RDS 1. 2. 3. 4. 5. AF – – / – PTY – AF. TA. PTY. PTY. PTY . RDS. 6. 7. 8. PS – SEEK+/SEEK- . 9. PREV – 10. EQ – , . 11. LOUD – RDS. . , LOUD. AF/EQ RDS . AF ; . Traffic Alarm TA/LOUD . TP. Traffic alarm. , TP 73 AF, «TA»
- Страница 74 из 103
«TA» ; . TA , . ( ., DVD, AUX), RDS. . PTY/ANGLE PTY, PTY UP/DOWN PTY ON; PTY CODE PTY SEARCH. PTY . . RDS . , . PTY OFF, : RDS RDS TA/LOUD . 74 TA, , PTY. , ,
- Страница 75 из 103
• • • • • • • • • • • • : DVD/DVD±R/DVD±RW/CD/CD-R/CD-RW. : DVD/SVCD/VCD/MP3/WMA/HDCD/CDDA/MPEG4(DivX)/PictureCD/JPEG. : : MP3 (*.mp3) WMA (*.wma) : MP4 (*.avi, DIVX3.11/4.0/5.0/6.0 and XVID) MPEG 2(*.vob) MPEG 1(*.dat) : JPEG (*.jpg) ISO 9660 ISO 9660 + Joliet 30 . – 448. -8 . – 99. - 99 59 . MP3
- Страница 76 из 103
DVD , PBC SVCD VCD , . , « DVD- , , ». DVD- , , . . SVCD, VCD . 76 CD.
- Страница 77 из 103
DVD DVD , . ENTER DVD EJECT . . . DVD STOP. ENTER . DVD / / . / , / . : 77 PAUSE
- Страница 78 из 103
(0-9) ; . RPT ; : P/N , PAL, NTSC AUTO. : DVD ZOOM . : 78
- Страница 79 из 103
OSD . : => => OSD => => . . DVD GOTO, ы/ ы / , / : я ТТ/ я ./ ENTER / я / / / . . . / . GOTO. ( Multi-angle) multi-angle ( DVD ), ANGLE . : multi-angle. DVD , 3 , , . ANGLE . ( Multi-audio) DVD AUDIO AUDIO 1 => AUDIO 2 => AUDIO 3. . . 79
- Страница 80 из 103
: , ( multi-audio. Multi-subtitle) DVD , SUB-T . : Subtitles 1 — Subtitles 2 — Subtitles OFF : , multi-subtitle. MENU 1. DVD AMS/MENU, . ; ENTER . 2. DVD . BAND/TITLE, ENTER . 80 ;
- Страница 81 из 103
DVD 1. 2. SETUP / , 3. 4. 5. , . : , DOLBY, . . / , . . / ENTER 6. 7. . . SETUP . • 4:3 PS: , , . 4:3 LB: , , . : • , . DVD – . 81 ,
- Страница 82 из 103
, DVD • , , . • . , • . . SUBTITLE , - , , . DOLBY • : . c , : 5,1- , . .: • . . . .: : . FULL OFF ( .) / . . . 82 .
- Страница 83 из 103
• . , PAL: NTSC: : , , • , . , . . , , . , . , . ST/AUDIO • LOC/SUB-T , , , • , . , : - – . . 1 8 , . . . 83 .
- Страница 84 из 103
, . « 8888), , , », ( ENTER. , « ». 8888 ( ), , . (8888) • (4 . ENTER, . . , . 84 ).
- Страница 85 из 103
VCD/CD . VCD/CD ; SOURCE VCD/CD . . , EJECT. / / , / / . RPT ; , . RDM . , . 85
- Страница 86 из 103
(0-9) . STOP. . ENTER PAUSE ( . / , / . : P/N PAUSE , PAL, NTSC 86 AUTO. )
- Страница 87 из 103
. : ZOOM . : OSD => => : => => OSD . DISP . GOTO; « »: —-:—- . . , « я », . V D / я , / / я : . / 87 / , я
- Страница 88 из 103
ENTER . / . GOTO. VCD ST/AUDIO PBC VCD, : BND/TITLE, PBC . . SEL/MENU, , SEL/TITLE. . : , PBC PBC 2.0 . VCD/CD PROG; . , , ENTER . . , ENTER. ENTER; 88
- Страница 89 из 103
ENTER. STOP PROG . • CD-R CD-RW, 44,1 • 128 MP3 / 3 256 . 3 . , • ISO 9660, 8, ( ). CD-R . • , MP3 CD-R . - • , , CD-RW 3 3 , CD-R , 3. CD-RW . • • . CD-R CD-RW 16 , . . 1. ID3TAG. , . 89
- Страница 90 из 103
MP4 MP4 (AVI, MPEG4) SOURCE ; . . (0-9). . MP4 (AVI, MPEG4) STOP PAUSE. . RDM . . ( ) MP4 (AVI, MPEG4) PAUSE . . MP4 (AVI, MPEG4) RPT , . 90 .
- Страница 91 из 103
OSD : – – . OSD . GOTO; —-:—- . , . GOTO, , ENTER. / / , / / . / , / . : ZOOM . : 91 ENTER -—:—-:—-,
- Страница 92 из 103
3 . MP3 /SD ; SOURCE . MP3 / . . , STOP, , : / /SD , . EJECT. SD , . / / / RPT ; . (0-9) . 92 .
- Страница 93 из 103
STOP, . MP3 GOTO; —-:—- . ENTER --:--. M 3 ; GOTO, . CLEAR . ( ) MP3 PAUSE . . / / . : OSD DISP . SD SD . 93
- Страница 94 из 103
• MP3 3 • • • • MPEG 3 . 3 ROM, CD-R/-RW. 3, 9660. , ISO 3, . 3, , “.mp3”. 3 • , “.mp3”, . , • PC “ ” “ “ ” MP3” “ . 448. . , , 3. 8 ”, . 8, • • • DVD-R/-RW, DVD+R/+RW, CD- VBR, , . VBR: . 94
- Страница 95 из 103
AUX/ ( SRC ) AUX. . SRC 1. . . 1 – 10 . 10 – 30 -- , . 2. CH-/CH+ . . 3. VOL+/VOL- . 4. STEP. 5. ANT. 6. SETUP. . . . : 95
- Страница 96 из 103
: SOUND ( ): M/N, B/G, D/K. BAND ( ): V-l, V-H, UHF MODE ( ): SECAM/NTSC/PAL 7. . 8. . 9. . . . , ; / 1-9 ; GOTO, 10, / . / , . AMS/MENU . 96
- Страница 97 из 103
• , • . • • , . , , • , . ( • • . , ). , . , . . . . ( . , ), , . . 97 .
- Страница 98 из 103
, , . . 98
- Страница 99 из 103
. , . « ». . . , . . . . . . . . . . . RESET. - . . . . . . . 99
- Страница 100 из 103
. . . 100
- Страница 101 из 103
( )/ 14,4 50 4 DVD/DVD±R/DVD±RW/CD/CD-R/CD-RW DVD/SVCD/VCD/MP3/WMA/HDCD/CDDA/MPEG4(DivX)/Pictu re-CD/JPEG 172 178 100 /2,6 -20º - +60º 40 CD, 120 3 6,5 480 234 16:9 300:1 350 / 2 PAL/NTSC/AUTO FM 65 10 18 – 74 µ AM 522 – 1620 12 101 /87,5 – 108
- Страница 102 из 103
AUTO/PAL/NTSC 48,25 – 863,25 . . 102
- Страница 103 из 103