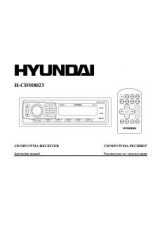
Инструкция для Hyundai H-CMD7079
 1
1 2
2 3
3 4
4 5
5 6
6 7
7 8
8 9
9 10
10 11
11 12
12 13
13 14
14 15
15 16
16 17
17 18
18 19
19 20
20 21
21 22
22 23
23 24
24 25
25 26
26 27
27 28
28 29
29 30
30 31
31 32
32 33
33 34
34 35
35 36
36 37
37 38
38 39
39 40
40 41
41 42
42 43
43 44
44 45
45 46
46 47
47 48
48 49
49 50
50 51
51 52
52 53
53 54
54 55
55 56
56 57
57 58
58 59
59 60
60 61
61 62
62 63
63 64
64 65
65 66
66 67
67 68
68 69
69 70
70 71
71 72
72 73
73 74
74 75
75 76
76 77
77 78
78 79
79 80
80 81
81 82
82 83
83 84
84 85
85 86
86 87
87 88
88 89
89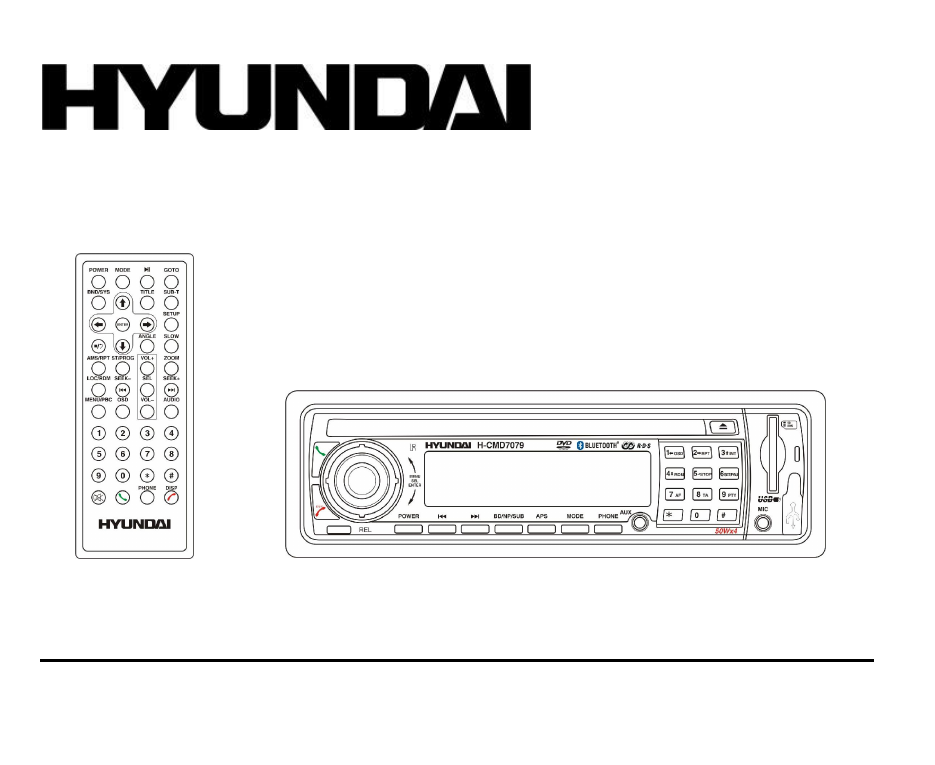
Оглавление инструкции
- Страница 1 из 90
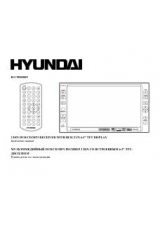
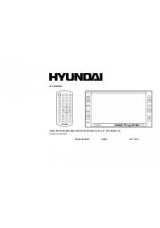
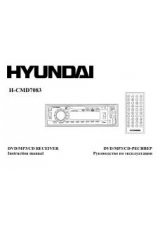
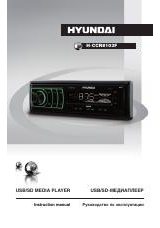
H- CMD7079 DVD RECEIVER WITH BLUETOOTH Instruction manual DVD- C BLUETOOTH
- Страница 2 из 90
Dear customer! Thank you for purchasing our product. For safety, it is strongly recommended to read this manual carefully before connecting, operating and/or adjusting the product and keep the manual for reference in the future. Table of contents Table of contents
- Страница 3 из 90
Important safeguards Using the device at temperature below -10º may cause the breakage of the device. Before using please heat up the passenger compartment to the recommended temperature! Read carefully through this manual to familiarize yourself with this high-quality system. Disconnect the
- Страница 4 из 90
Installation/Connections First complete the electrical connections, and then check them for correctness. If you are not confident working with electrical wiring, removing and reinstalling interior panels, carpeting, dashboards or other components of your vehicle, please call your dealer in order to
- Страница 5 из 90
Installation method A WARNING: Disconnect negative battery terminal from battery before starting installation. Consult the vehicle’s owner’s manual for proper instructions. Remove two transport screws from the top of the unit before installation. 1. After removing the old unit and mounting sleeve,
- Страница 6 из 90
Installation method B Note: Outer trim frame, hook, and mounting sleeve are not used for this installation. This is only intended as a general guide; contact the vehicle's manufacturer for specific instructions. This method of installation uses the screw holes at the sides of the unit and the holes
- Страница 7 из 90
Electrical connections Speaker Wiring Notes Follow the above wiring diagram to install the head unit with new or existing speakers. This unit is designed for use with four (4) speakers with the impedance between 4 Ohms to 8 Ohms. An impedance load of less than 4 Ohms could damage the unit. 7
- Страница 8 из 90
Never bridge or combine the speaker wire outputs. When not using four speakers, use electrical tape to tape the ends of the unused speaker outputs to prevent a short circuit. Never ground the negative speaker terminals to chassis ground. Using the ISO Connector 1. If your car is equipped with the
- Страница 9 из 90
Panel controls Front panel 1. 2. 3. 4. 5. 6. 7. 8. 9. 10. 11. 12. 13. REL button POWER button PREVIOUS button NEXT button BD/NP/SUB button APS button MODE button PHONE button AUX IN Numeric pad MIC in USB slot Bluetooth operation indicator 9
- Страница 10 из 90
14. 15. 16. 17. 18. 19. 20. 21. SD slot EJECT button LCD display Remote control sensor DISC slot ANSWER button VOL/SEL knob END CALL button Back of the front panel 1. 2. 3. 4. Disc loading slot Connector RESET button LED indicator 10
- Страница 11 из 90
Remote control (RC) 1. 2. 3. 4. 5. 6. 7. 8. 9. 10. 11. 12. 13. 14. 15. 16. 17. 18. 19. 20. 21. 22. POWER button MODE button BND/SYS button Cursor (LEFT/RIGHT/UP/DOWN)/ ENTER button STOP button AMS/RPT button ST/PROG button LOC/RDM button PREVIOUS/SEEK - button MENU/PBC button OSD button MUTE button
- Страница 12 из 90
23. 24. 25. 26. 27. VOL+/VOL-/SEL buttons AUDIO button Numeric pad CLOCK DISPLAY/END CALL button PHONE button Battery information of RC 1. Press the catch and at the same time pull out the battery tray. 2. Insert the 1 x lithium battery, type CR 2025 3V battery with the stamped (+) mark facing
- Страница 13 из 90
Glossary PBC (PlayBack Control) PlayBack Control is a menu recorded on the disc with SVCD or VCD2.0 format. For the discs contained PBC, it can playback interactive software with the menu displayed on TV. And if the disc contains still images, it can playback high definition of still image. Title
- Страница 14 из 90
General operations Reset the unit Operating the unit for the first time or after replacing the car battery, you must reset the unit. Press RESET button to restore the unit to the original factory settings. Power button Press POWER button to turn on the unit. Press POWER to switch the power off.
- Страница 15 из 90
ROCK => FLAT. Keep pressing SEL/VOL knob for 2 seconds to select the RDS function: TA SEEK/ALARM => RETUNE L/S => MASK DPI/ALL. TA (Traffic Announcement) mode To determine what action will the radio take if the newly tuned station does not receive TP (Transport Program) information for 5 seconds.
- Страница 16 из 90
To mask only the AF with different PI. - MASK ALL To mask both PI and strong signal non-RDS station. Mute Press the MUTE button to activate the Mute function. Press it again or use the VOL/SEL knob on the panel or press the VOL+/VOL- buttons on the RC to cancel. Adjusting clock 1. 2. 3. 4. 5. Press
- Страница 17 из 90
Radio operations Note: RDS (Radio Data System) service availability varies with areas. Please understand if RDS service is not available in you area, the following service is not available, either. Choose Radio Band Press BND/SYS button on the RC or BD/NP/SUB button on the panel to select a band.
- Страница 18 из 90
Save Your Preset Stations There are six numbered preset buttons, which can store and recall stations for each band. If while listening to a radio station you would like to save the station as a pre-set, press and hold one of the numeric buttons 1-6 until you hear a beep. The button you pressed is
- Страница 19 из 90
so that you do not have to re-tune the stations when driving between different transmitter coverage areas. When AF is on, it means RDS information is received; when AF is flashing, it means RDS information is not yet received. TA - TRAFFIC ANOUNCEMENT Press 8/TA numeric button on the panel so that
- Страница 20 из 90
DVD operations Insert/Eject disc Insert a disc into disc slot with label side up. The disc will be automatically loaded into the unit, even when it is off or in radio mode. The word “LOAD” will show on the display and the disc will play automatically. Press EJECT button to eject the disc from the
- Страница 21 из 90
Panel Numeric Pad functions The number 1-6 buttons contain dual functions during disc play. After pressing SETUP button (button 6 on the panel), the setup menu will be prompted. Then the number buttons are for navigating and confirming the commands. Button 1: Left/Display OSD Press the button 1 to
- Страница 22 из 90
Button 5: ENTER/Stop Press the button 5 as the ENTER button for confirming the commands on the setup menu. Press and hold the button for 3 seconds to stop the disc. The unit will be idle until further command is given. Press and hold the button 6 to play the disc again. Button 6: SETUP/Play/Pause
- Страница 23 из 90
Slow Motion Press SLOW button on the RC to perform slow motion of the video play. Slow motion speed within 1/2 up to 1/8 will be shown, according to the slowness. Cycle back to normal playback of press PLAY/PAUSE button to resume. Multi-Angle View Press ANGLE button on the RC to perform multi-angle
- Страница 24 из 90
Mixed-disc operations While you are playing mixed disc, which contains MP3, WMA, JPG or DivX formats, just insert the disc into the CD slot and the menu on the right hand side will be prompted. The unit will directly play the audio files. However, you can use the cursor buttons and ENTER button to
- Страница 25 из 90
Button 1-6 The functions of button 1-6 also apply to the mixed-disc play (See “DVD Operations” above). Return to the menu If you would like to go back to the playlist menu to choose the other file to view/listen to, press and hold button 5 to stop the playback. Then the playlist menu will be
- Страница 26 из 90
VCD/CD/MP3 operations Insert/Eject CD Insert a disc into CD slot with label side up. The disc will be automatically loaded into the unit, even when it is off or at radio mode. The word “LOAD” will show on the display and the disc will play automatically. Press EJECT button to eject the disc from
- Страница 27 из 90
Audio Selection Press AUDIO button on the RC to choose the audio language. The audio languages available differ from disc to disc. You can also use the setup menu to confirm. VCD: Press AUDIO button during playback. It is possible to switch the sound between mono and stereo sound. The sequence is
- Страница 28 из 90
AUX in, RCA out, SUB out, Video out and USB/SD operations Auxiliary Input The Auxiliary input jack is on the front of unit. Use the stereo jack wire (included) and connect to the stereo plug of the unit. Route the other end of the wire to the any external audio device. Press and hold the MODE
- Страница 29 из 90
USB and SD Card Insert USB flash drive or SD memory card in corresponding slot on the panel. The unit will automatically detect and play files. Following file types are supported by the unit: MP3, MP4, DivX, JPG. Press MODE button on the panel or RC to change current mode. The other operations are
- Страница 30 из 90
Menu operations Press SETUP button on the RC to display setup screen, use cursor LEFT/RIGHT and ENTER buttons to select the desired item: System, Language, Audio, Video, Digital. System setup TV system Select the TV system in the setting menu. Screen saver The screen saver appears if disc stop last
- Страница 31 из 90
Video output mode Original setting: INTERLACE-YUV. Setting TV type Select TV type to watch wide screen movies. 4:3 Pan Scan: For 4:3 TV, left and right edges will be cut. 4:3 Letter Box: For 4:3 TV, black bars will appear on top and bottom. 16:9: For 16:9 wide screen TV. Setting password Original
- Страница 32 из 90
Setting rating The rating of the disc is from 1 to 8: (1) with the most limits when playing. (8) with the least limits when playing. Original setting: 8 Note: The rating can be selected only under the password unlocked status, and the limits can be worked only under the password locked status. Load
- Страница 33 из 90
Setting the audio language Select the language to be used for the audio. You can select a preferred audio from those included on the DVD video disk. (The screen on your player may have difference with the screen shown here). Setting the subtitle language Select the language to be used for the
- Страница 34 из 90
Audio setup Digital output Select digital output format. SPDIF/OFF: There is no signal output from coaxial or optical output. SPDIF/RAW: When the unit is connected with the amplifier by coaxial or optical connecter, please select this mode. SPDIF/PCM: When the unit is connected with the two-channel
- Страница 35 из 90
Contrast Set the contrast of the video output with UP/DOWN cursor buttons. Hue Set the hue of the video output with UP/DOWN cursor buttons. Saturation Set the saturation of the video output with UP/DOWN cursor buttons. 35
- Страница 36 из 90
Sharpness Set the sharpness of the video output with UP/DOWN cursor buttons. Digital setup Output mode Select the output mode: LINE OUT: Compress the input signal. The volume is small. RF REMOD: The volume is large. Dynamic range When you select the compressed mode as “line out”, select it to
- Страница 37 из 90
Dual mono Select the audio channel from STEREO, MONO L, MONO R and MIX MONO. 37
- Страница 38 из 90
Bluetooth operations Pairing First, make sure the bluetooth function in your headset is set to “ON”. Then press and hold PHONE button until “PAIRING” blinks on the display waiting for the bluetooth device to connect. At this time, please run the bluetooth search and connect function in your cell
- Страница 39 из 90
Answering call on the front panel When there is an incoming call, press ANSWER button to receive a call in your unit. You can perform this function on the front panel or on the RC. Ending call on the front panel When you have finished a call, or you do not want to answer it, press END CALL button
- Страница 40 из 90
speakers. Note: It is highly recommended that A2DP mode should not be used simultaneously with Phone mode. Please quit A2DP mode before attempting to make any phone call, otherwise unexpected results would occur, depending on different cell phone models. 40
- Страница 41 из 90
Handling discs Dirty, scratched or warped discs may cause skip ping or noise. Handle the disc only by the edges. To keep clean do not touch its surface. Discs should be stored in their cases after use to avoid scratches. Do not expose discs to direct sunlight, high humidity, high temperature or
- Страница 42 из 90
Troubleshooting guide Symptom Cause Solution General No power The car ignition is not on. The fuse is blown. If the power supply is properly connected to the car accessory switch the ignition key to “ACC”. Replace the fuse. Disc Disc cannot be loaded. Presence of disc inside the player. Remove the
- Страница 43 из 90
Specification General Power supply: Fuse: Maximum power output: Dimensions (W x H x D): ESP function FM stereo radio Frequency range: Sensitivity: Preset memory: MW section Frequency range: Preset memory: DVD deck specification Format: Disc types: Video system/Audio system: Video specification
- Страница 44 из 90
Frequency response: S/N ratio (A-vtd)/Separation: Line out Output: Bluetooth Bluetooth compatibility 20 Hz to 20 KHz 80dB/50dB 2 channels RCA line-out (2V) V 1.2/2.0 Specifications are subject to change without notice. Dimensions are approximate. 44
- Страница 45 из 90
! . , , . ........................................................................................................................................................45 ...................................................................................................................................46
- Страница 46 из 90
-10º . ! , . . , , . , . . , , . , . , , . , , , . . , , . , , , , , . . , . , . . . . 46 ,
- Страница 47 из 90
. , , , . 1. . . , , . , . ! 2. . . . , . . (+ ). . , . 47 -),
- Страница 48 из 90
A : . . 1. . 2. 3. . . . . . 4. . 48
- Страница 49 из 90
: , . , . , . 1. 2. . . 2 . . 3. , . 49
- Страница 50 из 90
. 4 4 , 4 50 8 . .
- Страница 51 из 90
. 4 , . . ISO 1. ISO, , . 2. ISO , . , . A 1 2 3 4 5 6 7 8 B (+)--(-)--(+)--(-)--(+)--((-)--(+)--(-)--- 12 (+)/ / ACC+/ 51
- Страница 52 из 90
1. 2. 3. 4. 5. 6. 7. 8. 9. 10. 11. 12. USB 13. REL POWER PREVIOUS NEXT BD/NP/SUB APS MODE PHONE AUX Bluetooth 52
- Страница 53 из 90
14. SD 15. 16. LCD 17. 18. 19. 20. 21. 1. 2. 3. 4. LED EJECT ANSWER VOL/SEL END CALL RESET 53
- Страница 54 из 90
( 1. 2. 3. 4. 5. 6. 7. 8. 9. 10. 11. 12. 13. 14. 15. 16. 17. 18. 19. 20. 21. 22. POWER MODE BND/SYS ( ENTER STOP AMS/RPT ST/PROG LOC/RDM PREVIOUS/SEEK MENU/PBC OSD MUTE ANSWER GOTO PLAY/PAUSE SUB-T TITLE SETUP SLOW ANGLE ZOOM NEXT/SEEK + )/ 54 )
- Страница 55 из 90
23. 24. 25. 26. 27. VOL+/VOL-/SEL AUDIO CLOCK DISPLAY/END CALL PHONE : 1. . 2. CR 2025 3 , + . . : . , . , , . , . , , , . 55
- Страница 56 из 90
PBC ( ) – , . , PBC, . . – DVD. 1, . , , 3. 2 , . , . . – . . , . 56 ,
- Страница 57 из 90
RESET, . : , , . POWER, . . POWER, , , – RADIO, DISC PLAY, USB, SD Card AUX. . MODE VOL/SEL VOL+/VOL- , . VOL/SEL, : VOL => BAS => TRE => BAL => FAD => LOUD OFF => LOC OFF => STON => EQ OFF. VOLUME ( ): VOL/SEL VOL+/VOL, . BASS ( ), TRE LE ( ), BALANCE ( ), 57
- Страница 58 из 90
FADER ( ): VOL/SEL, . LOUD: . LOUD ON ( .) VOL/SEL, LOUD OFF ( .). LOC: VOL/SEL, : LOCAL ON ) LOCAL OFF ( ./ ). STEREO: VOL/SEL, : STEREO ON STEREO OFF. EQ: VOL/SEL, , : OFF ( .) => CLASSIC => POP => ROCK => FLAT. VOL/SEL 2 , RSD: TA SEEK/ALARM => RETUNE L/S => MASK DPI/ALL. ( ) TA TA, TP ( ) , . ,
- Страница 59 из 90
- RETUNE L: : MASK , Retune TA SEEK 90 . TA SEEK. TA , . , . AF . , : MASK DPI VOL/SEL MASK ALL. : , - MASK DPI: . - MASK ALL: , MUTE, VOL+/VOL- RDS. . VOL+/VOL- 1. 2. 3. 4. 5. , , . CLOCK DISPLAY . VOL/SEL, VOL/SEL, VOL/SEL, CLOCK DISPLAY . 3 , . . . . . , 59
- Страница 60 из 90
: RDS RDS ( ) . , BND/SYS FM1, FM2, FM3, MW1 30 . 5 , : PREVIOUS/NEXT , . BD/NP/SUB MW2. NEXT/SEEK+ . 6 PREVIOUS/SEEK. , : , . , , ST/PROG «ST ON», LOC/RDM . . , . . , . «LOC ON», ; 60
- Страница 61 из 90
«LOC OFF» . , . (1-6) . (1-6). FM APS FM APS M 3 . . 3 . . APS FM , AMS . APS AMS , FM , EON ( . ) EON , , . , , , . . 61 EON
- Страница 62 из 90
AF ( ) 7/AF , (ON) (OFF) AF. AF. , AF ON , ON ( . , . .) TA ( ) 8/TA . ; , TA, SEL «TA SEEK». SEEK 2 , TA VOL/SEL TA ALARM; . TA SEEK 8/TA; TA ALARM TA/TP PTY - PROGRAM TYPE ( . ) , . 9/PTY 9/PTY (1-6), , . . , . . . 62 (1-6),
- Страница 63 из 90
DVD . , . , «LOAD», . . , . 5 EJECT, . , . ( ) 1/OSD OSD . . , . . DVD . . . PBC/MENU . , TITLE . NEXT . . NEXT . 63 ,
- Страница 64 из 90
PREVIOUS . . PREVIOUS , , . . PREVIOUS/SEEK- NEX/SEEK+ . SETUP ( . 1-6 6 ) . . 1: OSD 1 . 3 . 2: 2 . 3 . «RPT». . . 3: (Intro) . 3 15 3 “INT". . . : Intro DVD . 64
- Страница 65 из 90
4: 4 . 3 . . «RDM». : DVD . 5: 5 3 . . . 6: SETUP/ 6 6 . 1-5 . . 3 . . AUDIO . ( ). . SUB-T . ). ( . 65
- Страница 66 из 90
GOTO . . , . ENTER . +/ZOOM . 2 4 ( SLOW 7 ). . 1/2 1/8. PLAY/PAUSE. ANGLE . . : . , , , . «INVALID KEY». BND/SYS : NTSC, PAL, PAL60, AUTO. ( , 66 AUTO. ). ,
- Страница 67 из 90
ST/PROG . . . ST/PROG . (ESP) . DVD– 5 67 (ESP) . Enter
- Страница 68 из 90
, . MP3, WMA, JPG DivX, , . ENTER . . ENTER . , . JPG ENTER . . . jpg . MP4, MPEG4 (*.avi). . , . NEXT . . NEXT . PREVIOUS . . PREVIOUS 68 , . . DivX
- Страница 69 из 90
, , . PREVIOUS/SEEK- or NEXT/SEEK+ . 1-6 1-6 , , , . , . 5 , . 69
- Страница 70 из 90
VCD/CD/ 3 . , . , «LOAD», . EJECT, , . . , 5 , . CD CD . . NEXT . . NEXT . PREVIOUS . . PREVIOUS , , . . PREVIOUS/SEEK- or NEXT/SEEK+ . 1-6 1-6 , , 70 .
- Страница 71 из 90
AUDIO . ( ). VCD: . AUDIO . . ) --> ( AUDIO CD: )--> ( )--> ( . : )--> ( ) . ) --> ( )--> ( : ) VCD2.0 MENU/PBC . (ESP) . , (ESP) VCD, CD - 10 . 71 , MP3 - 120 .
- Страница 72 из 90
AUX in, RCA, SUB out, USB/SD AUX AUX . ) RCA AUX IN. RCA . MODE VOL/SEL AUX. . RCA RCA ( , = RCA ( . ). , , = ). . ( , . ). RCA. . . AUX. , AUX. 72
- Страница 73 из 90
( . ). ) ( ( ) , . . , . USB BND/NP/SUB PAL NTSC. SD USB SD- . . MP4, DivX, JPG. MODE USB SD : MP3, . , , 73 .
- Страница 74 из 90
SETUP , , ENTER, : , , , , . « : 74 ». 3 . .
- Страница 75 из 90
: INTERLACE-YUV. 4:3 PS: 4:3 LB: 4:3. 4:3, . 16:9: 16:9. 0000. 75 . .
- Страница 76 из 90
1 8: (1) (8) . . :8 : , . , . . 76
- Страница 77 из 90
. DVD .( ). . DVD . DVD 77 . ( ). . ( ).
- Страница 78 из 90
. : . SPDIF/ RAW: . SPDIF/ PCM: . . . 78
- Страница 79 из 90
. . . . 79
- Страница 80 из 90
: LINE OUT: RF REMOD: . . . «line out», , . «Full», , «Off», . : . 80 , , ,
- Страница 81 из 90
Bluetooth PHONE, «PAIRING». bluetooth «BT car stereo». . . «0000» . bluetooth; . , , ANSWER, PHONE 1-0 . . , , : END CALL. bluetooth , 15 ANSWER . . PHONE VOL/SEL , “DIS CONN”. SEL, ; . . 81
- Страница 82 из 90
ANSWER, , . . , . END CALL «Hang up». , . . , , bluetooth bluetooth , , ), bluetooth . , Melody ( ANSWER, . ) PHONE, MELODY 1. VOL/SEL, VOL/SEL, 1-6 . PHONE “MELODY”, VOL/SEL «TEL» VOL/SEL, 0 39. 82
- Страница 83 из 90
A2DP . , bluetooth». « . “BT PLAY” , , : A2DP A2DP , , ( ). 83 . .
- Страница 84 из 90
, ( ). , . , , . , . ( , ). . , , . , . , . 84
- Страница 85 из 90
. ( , ), , . . , , , . . , , . . 85
- Страница 86 из 90
. , “ ”. . . . , . . . . . , . . . . . . RESET. . . 30 . . , 30 . . . . . . . . 86
- Страница 87 из 90
87
- Страница 88 из 90
: : : ( ESP: ): 12 10 A 1 A 50 4 178 x 51 x 178 mm 10 CD/120 c MP3 FM : : 87.5 - 108.0 12 18 : 522 12 : MW : – 1620 DVD : DVD/SVCD/VCD/HDCD/MP3/MPEG 4/WMA/CDDA/JPEG/DVD Audio/USB/SD/MMC DVD±R/±RW/CD/CD-R/CD-RW NTSC/PAL/NTSC/24 /96 : : : 16:9 4:3 1,0 /75 500 : ( . ): : 2 (+/-3 ) 88
- Страница 89 из 90
: 20 80 - 20 /50 : Bluetooth RCABluetooth (2V) V 1.2/2.0 . . 89
- Страница 90 из 90