Инструкция для Hyundai H-LCD3200
 1
1 2
2 3
3 4
4 5
5 6
6 7
7 8
8 9
9 10
10 11
11 12
12 13
13 14
14 15
15 16
16 17
17 18
18 19
19 20
20 21
21 22
22 23
23 24
24 25
25 26
26 27
27 28
28 29
29 30
30 31
31 32
32 33
33 34
34 35
35 36
36 37
37 38
38 39
39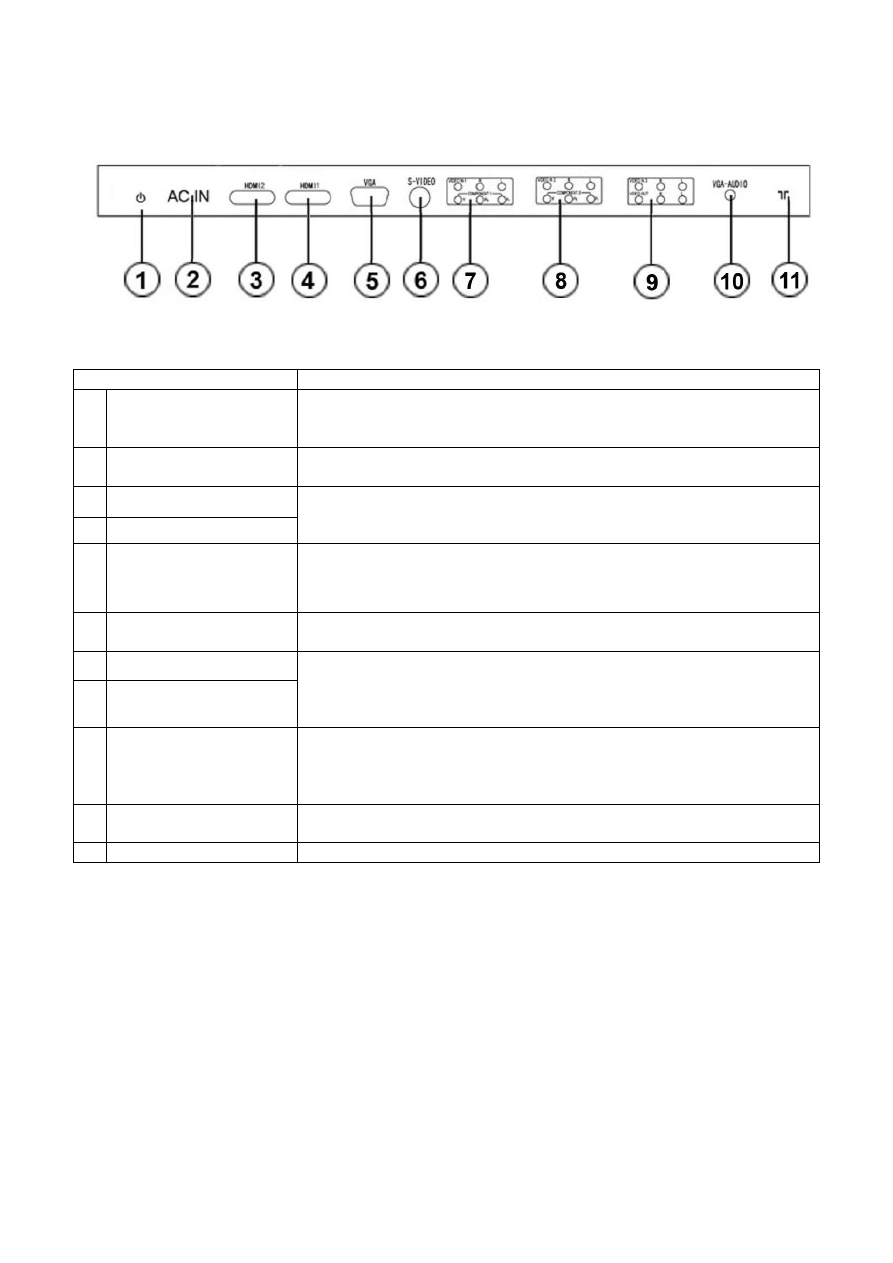
7
Rear panel terminals and controls
Items
Connection description
1
AC (Power) switch
Turn on the AC switch; the TV will enter into standby mode. When a com-
plete turning off is required, please turn off the AC switch and unplug the
power cable from the power socket.
2 AC
input
Connect the AC power cable with 100-240V AC power supply. Connect the
other end of the AC power cable with the AC power port on the TV.
3 HDMI
2
4 HDMI
1
Connect one end of the HDMI cable with HDMI output port, connect the
other end of the HDMI cable with the HDMI port on the TV, and tighten the
bolts clockwise on the each end of HDMI cable.
5 VGA
Connect one end of the VGA cable with the VGA port on computer, con-
nect the other end of the VGA cable with the VGA port on the TV, and
tighten the bolts clockwise on the each end of VGA cable.
6 S-Video
The output S-Video terminal of DVD can be connected with the S-Video
input port of the TV through S-Video cable.
7
Component video input 1
8
Component video input 2
It’s convenient to receive the component video signal of high definition
from DVD player. The output Component (YPbPr) terminal of DVD can be
connected with the Component (YPbPr) input port of the TV through AV
cable.
9 Composite video output
The product can receive different signals (the programs send by TV station)
and transfer these signals through AV signal cable to other audio and video
equipments. The AV output of the TV can be connected with the input port
of other AV equipment through AV cable.
10
VGA (PC) audio input
You can enjoy the audio information from computer by connecting with
computer with an audio adapter cable.
11
RF antenna
The RF output terminal can be connected with the RF input port of the TV.
Notes:
Ensure that the power to the LCD TV and other connected devices is off before you make any connec-
tions.
When connect, plug directly and slightly to the interface, otherwise you will damage the stitch.
SVIDEO and AV cannot be used at same time for they share of one signal channel.
Check and make sure that all AV cables are connected with the corresponding ports correctly.
Оглавление инструкции
- Страница 1 из 40
H-LCD3200 LCD TV Instruction manual LCD
- Страница 2 из 40
Table of contents Table of contents ......................................................................................................................................... 2 Important safety precautions
- Страница 3 из 40
Important safety precautions Warning Please unplug the power cord from the AC outlet and contact our service personnel to repair under the following conditions: Any obvious abnormality appears in the product, such as smoky, peculiar smell or strange sound. When a liquid has been spilled or other
- Страница 4 из 40
Fasten the wheel of the product or shelf with wheels when installing this product. If it moves or is tipped over, it may be damaged. Do not place any fire source such as candlelight close to this product or place it on this product. If it is tipped over or fallen down, it may cause damage or fire.
- Страница 5 из 40
General introduction Size of the screen: 32"/81 cm Aspect ratio: 16:9 Screen resolution: 1366 x 768 Brightness: 500 cd/m2 Contrast: 1000:1 Wide viewing angle 176º/176º Response time: 8 ms Progressive scan Color systems: PAL, SECAM, NTSC Digital comb filter NICAM Stereo, 2 x 5 W “Picture in picture”
- Страница 6 из 40
Controls and connection Place your LCD TV on a flat surface in a well-ventilated location. Rear panel Earphone jack Top panel button description Button MENU TV/AV VOL-/+ CH+/POWER Description Open the menu or switch among the menus. To switch among the signal source. Decrease/increase the sound
- Страница 7 из 40
Rear panel terminals and controls Items 1 AC (Power) switch 2 AC input 3 HDMI 2 4 HDMI 1 5 VGA 6 S-Video 7 Component video input 1 8 Component video input 2 9 Composite video output 10 VGA (PC) audio input 11 RF antenna Connection description Turn on the AC switch; the TV will enter into standby
- Страница 8 из 40
Remote control (RC) 1. 2. 3. 4. 5. 6. 7. 8. 9. 10. 11. 12. 13. 14. 15. 16. 17. 18. 19. 20. 21. 22. 23. 24. 25. 26. 27. 28. 29. 30. 31. 32. 33. 34. ZOOM button. In TV, AV, SVIDEO mode. RECALL button. The former channel can be restored if the last operation is changing channel; this button also can
- Страница 9 из 40
Insert the batteries Remove the battery cover by pressing the symbol and pulling the cover space in the direction of the arrow. Insert the two 1.5V (AAA size) batteries making sure the polarity (+ or -) of the batteries matches the polarity marks inside the unit. Replace the battery cover by
- Страница 10 из 40
OSD operations Note: In this manual the OSD (On Screen Display) may be different from your TV’s because it is just an example to help you with the TV operation. In the following contents, press MENU button to enter the menu; press P+/P- buttons to select an item. The highlight background means the
- Страница 11 из 40
During searching, press MENU button to quit the automatic search and go back to the previous menu. Automatic searching starts from Channel 1, all the searched channels will be stored automatically. During searching, the modes of color and sound are automatically stored, thus to make sure the
- Страница 12 из 40
Timer Press MENU button, and select the TIMER setting menu described as the following picture: Current Time. Set the current time by pressing V+/Vbuttons and P+/P- buttons to change the time parameter (hour: minute), or you can directly input the time through the number buttons. Off Time. Set the
- Страница 13 из 40
Power Manage. Power Management Mode, you can select Off, 2 hours, 3 hours and 4 hours by pressing V+/V- buttons, this operation means if there is no any operation to the TV in 2 or 3 or 4 hours, the TV will enter into the standby mode automatically. Panel Lock. Locking the buttons of the TV, when
- Страница 14 из 40
Other Operations Turning on/off the TV Turning on 1. Connect the power input port on TV with AC power cable, and then connect it with A power supply, turn on the AC switch of the TV, the indicator turns red, TV enters into standby mode. 2. In standby mode, press POWER button on TV or on the RC to
- Страница 15 из 40
any of the following operation is made: pressing MUTE button, adjusting the TV’s volume or adjusting the sound “Balance”. Switching to stereo or bilingual, the mute mode can be quitted, but you cannot quit the mute mode by reducing the volume. The icon displayed on the lower left position is as the
- Страница 16 из 40
COMP1 TIME 720P/60Hz COMP2 TIME ## PIP function is “OFF” 720P/60Hz AUTO -------- PIP function is “ON” “##” is the number of current PIP channel. “- - - -” is the name of the PIP channel (at most 7 letters), if the channel name is not changed, “----” will be displayed, “AUTO/DK” is the current PIP
- Страница 17 из 40
System will power down Press OK to cancel Xx “xx” is the remained number which indicates you with how many seconds the TV will enter into standby mode. The value will be deducted to 0 from 30. At this time, you can press MENU, EXIT, OK on the RC to quit the standby mode, which the TV will carry out
- Страница 18 из 40
Troubleshooting Before calling a technician, please check the following items to see whether you can easily diagnose and fix the encountered symptoms on your own. Symptoms No picture, no sound, and no indicator light Picture and sound with abnormity Picture is spotted or with snow Blue background
- Страница 19 из 40
The causes of interference Incorporated in your TV receiver are the most up-to-date devices to eliminate interference. Local radiation however, can create disturbances, which visibly affect your picture. Proper installations, a good aerial are your best safeguards against these disturbances. RF
- Страница 20 из 40
Specifications LCD panel items Items Size (diagonal) Brightness Contrast Angle of view High speed response Resolution H-LCD3200 32” (81 cm) 500 (cd/m2) 1000:1 176°/176° 8 ms 1366 x 768 PAL, NTSC, SECAM DK, I, BG, M 2x5W 480i, 480P, 576i, 576P, 720P, 1080i, 1080p 3 lines 1 line 2 lines Yes Yes 2
- Страница 21 из 40
...............................................................................................................................................21 ....................................................................................................22
- Страница 22 из 40
, - : , , , - . . . . , . . - , . . - , . , , , , . , , - , . , . - . . , . . . . , . . , . , , . , , . , , , . , - . , . , , –20° , . +50° . . , . - . . . . 22
- Страница 23 из 40
, , . . : ; ( LCD- 10 ). , . , , . , . , , - . , . . , , - . . , , LCD LCD , . - . . . : , LCD - . - . . , . . , , 18 . . , 2 : . . . . . : . LCD , . 23 -
- Страница 24 из 40
: 32"/81 : 16:9 : 1366 x 768 : 500 ² : 1000:1 : 176º/176º :8 : PAL, SECAM, NTSC NICAM, 2 x 5 « » : 2 HDMI, VGA, S-Video, 3 , , ,2 , RF- : 100-240 B, 50/60 : , . . , . ( 24 )
- Страница 25 из 40
. - MENU TV/AV . . . VOL-/+ . TV CH+/- . . POWER . ( . ): . , . - . , . 25
- Страница 26 из 40
1 ; - . , . - 2 3 4 HDMI 2 HDMI 1 5 VGA 6 S-Video 7 8 - 100-240 HDMI AC . HDMI ; . VGA VGA VGA - ; . S-Video Video S-Video 1 DVD AV 2 DVD S- . . DVD (YPbPr) (YPbPr) . - 9 . AV 10 VGA (PC) . . 11 . : , , , - . , . S-Video AV . , . 26
- Страница 27 из 40
( 1. ZOOM. ) TV, AV, S- Video. 2. RECALL. , . - . 3. 4. 5. . AV. P.MODE. . - . 6. MENU. ; 7. . V-/V+. ; ; V+ 8. 9. . OK. . . - . 10. DISPLAY. 11. 12. STILL. TEXT. 13. MIX. . . . - . 14. HOLD. . 15. 16. 17. 18. 19. 20. 21. 22. 23. 24. SIZE. E/W. FAVS/CH+. . . PIP. CH-. POWER. HDM. S.MODE. EXIT.
- Страница 28 из 40
, , , - . 1,5 (AAA) (+/-). ). ( : , . . , . : . , , - . . . - . , . 28
- Страница 29 из 40
: - . . MENU, . P+/P-, . . V+/V-, . MENU, EXIT, . MENU . MENU ( . ). . - . . . . - . . . ( . NTSC). . - . : DNR ( )( ), ( , , . NTSC). ; . , DNR: MENU ). . . . . . . . . ( . . MENU ). . ; V+/V- - . . V+/V-, . . V+/V-, . . TV ( . V+ ). 29 -
- Страница 30 из 40
MENU, . 1, - . ; , . , (236), , MENU , 1. . TV , ; V+/V. OK. , - V+/V-. , ( AFT ( ). ). TV « », - V+/V; . . , OK V+/V-, , P+/P-. V+/V- - . . OK MENU, . , TV V+/V-, - OK , . P+/P-, , . , V+ - P+/P-, , . V. , “ ” . , . : AV, SVIDEO, COMPONENT, PC . HDMI AV SVIDEO. AUTO; . . - , . VGA. . ( ). . : VGA
- Страница 31 из 40
. . V-/V+. MENU, , - . . V+/V- P+/P- . . . V+/V- P+/P- . . PROG. . P+/P- V+/V. . PROG. . - , (000-235). V+/V- . . ; “ ”, “ ” - “ .”. . OK V+/V-, , . - P+/P, OK V+/V-, . V+/V-, P+/P- . - . . PROG V+/V-, ; « » ( ). MENU, , - . . , ( - ). . . SVIDEO, NENT HDMI, TV, AV ZOOM 16:9, 14:9, 4:3. PC,
- Страница 32 из 40
» . 4 ( ,2 ,3 4 V+/V-. ), ) (2, 3 . . . . ( 5 - . . . . . (0, 1, 2, 3, 4, 5, 6, 7) . PIP. P+/POK PIP”, MP. HDMI2; PIP. PIP. . . : V-: ; V+/V-, “ . PIP COMP1, COMP2, PC, HDMI, , . V+/VPIP: TV, AV1, AV2, AV3. PIP. PIP. PIP. . . V+: : AV 2: “PIP” 1: PIP (TV, AV1, AV2, AV3). “PIP”. . OK V+/V-. ”, . P-:
- Страница 33 из 40
1. . . - . . 2. POWER , . , . . : . 1. , POWER . 2. , - . : . - , . . 5 ( ) , . POWER , . POWER - . , COMP2, PC P+/P. . TV/AV . HDMI, HDMI2 AV , : TV, AV1, AV2, AV3, SVIDEO, COMP1, CH+/CHTV CH+/CH. . , P+/P« », . 6 - . , , , , MENU AV, SVIDEO, COMP, PC . - OK. . HDMI - , VOL+/VOL- V+/V2 0-100, 33 .
- Страница 34 из 40
MUTE , . ( . - ). MUTE, : - . : TV HDMI, ; . P.MODE : , , . . , . S.MODE . : , . , - , . TV ( ) DISPLAY , , : ## AUTO TIME -------- “##” ; , , AFT “ ”, ); “AUTO/DK” AV, SVIDEO, COMP, DISPLAY; 7 AV ; ; ; - “- - - -” ; “TIME” ( . HDMI . SVIDEO ( - ) : XX TIME COMP1, COMP1 NO SIGNAL (« 720P/60 AUTO
- Страница 35 из 40
COMP1 TIME 720P/60Hz COMP2 TIME ## PIP “##” ); “AUTO/DK” “XX” 7 VGA, NAL (« 1024*768/60 , PIP HDMI ») . 720P/60Hz AUTO -------- PIP “- - - -” PIP PIP . COMP1, COMP2, HDMI HDMI2 ( HDMI2. NO SIG- ), : XX TIME 1024*768/60Hz XX TIME ## 1024*768/60Hz AUTO -------- PIP “##” ); “AUTO/DK” “XX” 7 ( PIP PIP
- Страница 36 из 40
xx “xx” , . 30 EXIT 0. OK MENU, . (Recall) RECALL ; , - . , . « » ; 1. 2, , 20 , ( – 10 - ). , , FAVS. P+ TV P-, . SCAN, . 9 . (1-9). 2.5. 36 -
- Страница 37 из 40
, , . . , , , . , - - - , - , . - AUTO . . . . « - . - . . . VGA - . . » , . CH+/CH- - . . . . - . . , - . . . 37
- Страница 38 из 40
, , . . . « » . » , ». , « . , , , , . . . 38 -
- Страница 39 из 40
( H-LCD3200 32” (81 ) 500 ( ²) 1000:1 176°/176° 8 1366 x 768 PAL, NTSC, SECAM DK, I, BG, M 2x5 480i, 480 , 576i, 576 , 720 , 1080i, 1080p 3 1 2 ) LCD NICAM YPbPr AV AV (YPbPr) PC PC VGA HDMI 2 Plug and Play » 236 ~100-240 ; 50/60 22 : LCD , , . , ( , , , LCD - ). . : . 39
- Страница 40 из 40